Review: Chocolate Chip Cookies

Advertisements

Original recipe can be found here.

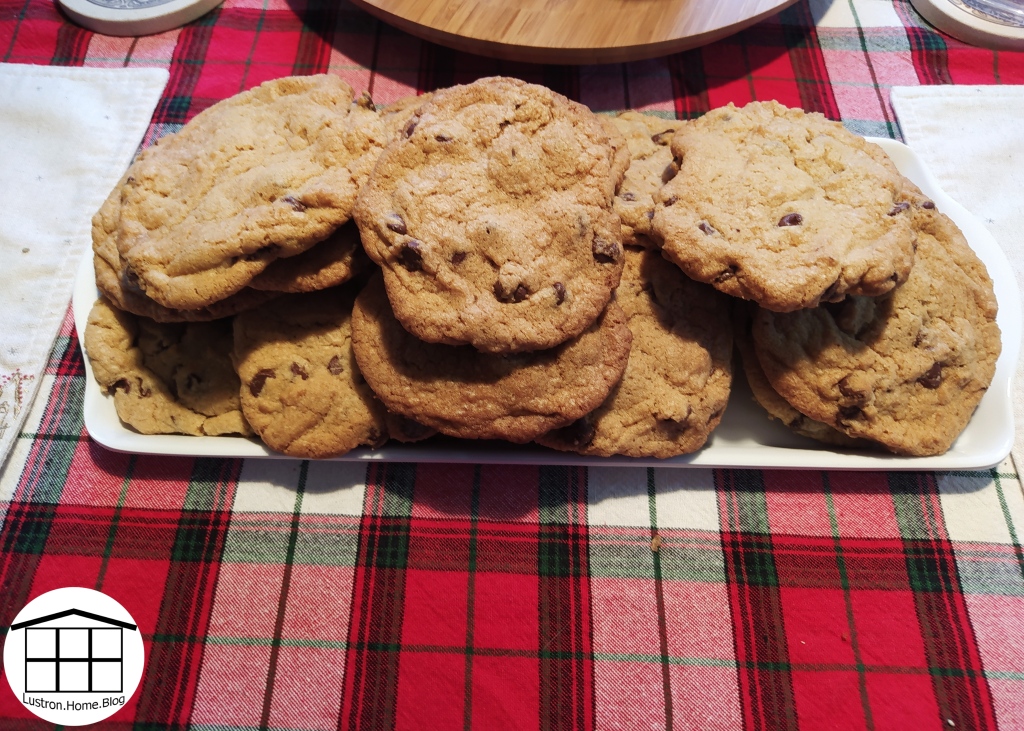
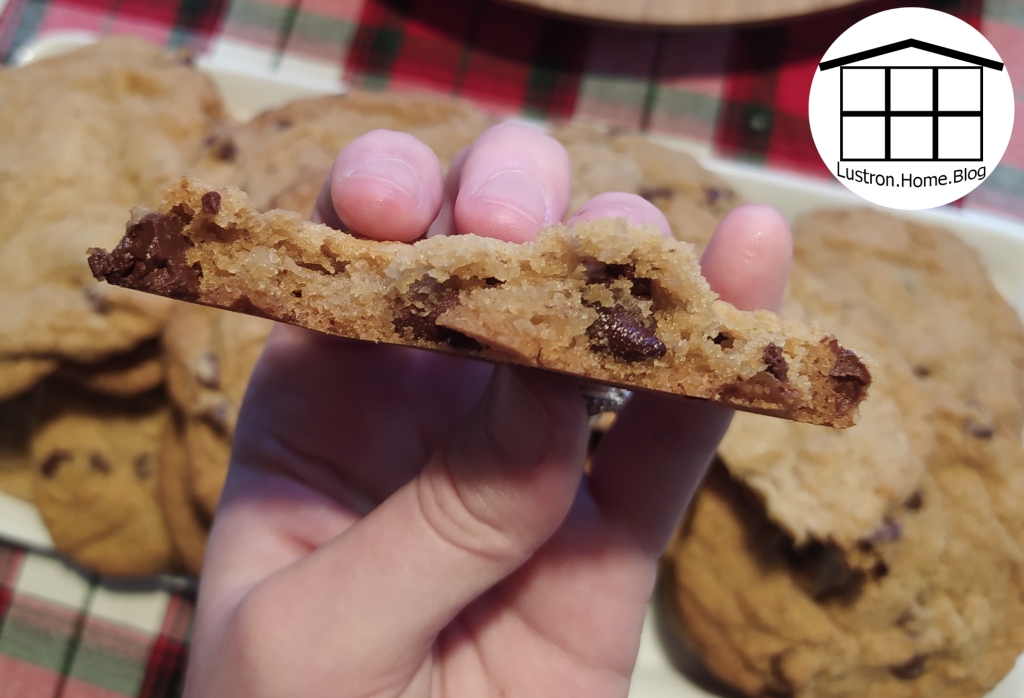
I found this recipe for chocolate chip cookies and I just had to try them. I grew up making Betty Crocker cookies from their bagged mix. I really enjoyed them and I found this recipe be be similar in many ways, but also different. The recipe I made was a recipe from scratch and is standard, cream together butter and sugar, then mix in remaining ingredients. This created cookies with a crackled top. I also made my cookies about twice the size the recipe expected. This recipe didn’t say how big to make the cookies, and I guess I went a little large. Since I went large, about 2 Tbsp of dough per ball, my cookies took a bit longer. The recipe says 8-10 minutes for about 1 Tbsp balls, I found 12 minutes to be about right to keep some moisture in the cookies while still cooking the inside completely. My second batch I baked for 15 minutes, since I was waiting for a bit more browning, but that never came. They were delicious when slightly warm, but once they fully cooled, they were very crunchy, and needed to be paired with a glass of milk. So note with this recipe, not to over cook these cookies! However, this was the easiest cookie dough I’ve ever worked with. This recipe made 24 cookies 3-4 inches in diameter.

Advertisements

What You Will Need

  • 2 1/4 cups all-purpose flour
  • 1 tsp baking soda
  • pinch of salt
  • 1 cup butter, softened
  • 3/4 cup granulated sugar
  • 3/4 cup packed brown sugar
  • 1 egg
  • 1 teaspoon vanilla
  • 1 1/2 cup semisweet chocolate chips, or 12 Oz bag, to your taste

Directions

1. Heat oven to 375 F. In a large bowl, add softener butter, sugar, and brown sugar. Beat until light and fluffy, and scrape down sides of bowl. Add egg and vanilla and beat until smooth. Add Baking soda and a pinch of salt and briefly mix, then add your flour and mix until fully combined. Add in chips and stir until evenly dispersed.

2. Add 2 Tbsp balls onto 9×13 pans, 2 inches apart. Bake for 11-12 minutes, and not longer. Remove from oven and let cool for 4 minutes before remove from tray and transferring to a cooling rack or serving tray.

Advertisements

Fried Pork With Asian Stir-Fried Veggies Over Rice

Advertisements

When I made this, I cut the pork before breading and frying, but that was a huge waste of time. I also added them once fried to the wok with the veggies, that was also very unnecessary. The pork gets no additional flavor from going back into the wok, and this can damage the nice breading you spent time making. Otherwise this was a very delicious meal. Also, sorry for the lack of pictures lately. I’ve been having trouble staying on top of that, so some of the next few post will also have the same pattern until I can form the habit again. Thanks for your patience!

Advertisements

What You Will Need

  • 2 pork chops
  • 2 eggs
  • 1/2 cup flour
  • 1/2 cup Panko bread crumbs
  • 1 Cup Vegetable Oil
  • 2 cups Cabbage, chopped
  • 1 cup Green Beans, cut to 1 inch
  • 1/2 cup Onion, sliced
  • 1/2 cup Celery, diced
  • 2 tsp Ginger paste
  • 1/3 cup Soy Sauce
  • 2 Tbsp Oyster sauce
  • Wok
  • 3 Cups cooked rice

Directions

1. Begin by cooking your rice, and placing each ingredient in it’s own bowl: Egg, Flour, and Panko. Coat your pork in egg, then flour, then egg a second time, then panko, seat aside and repeat with the second pork chop. Place your wok over medium heat and add oil. Once the oil is shimmering, add one pork chop. Fry on each side for 3 minutes, then strain on paper towels. Fry your second the same way.

2. In the same wok with oil, add your onion, celery, green beans, ginger paste, and cabbage and cook for 3 minutes. Add the soy sauce and the oyster sauce, then stir to coat everything. Cut your pork chops into slices, then remove vegetables from heat. Plate with 1/2 cup rice, when top with stir fried vegetables and 4-5 slices of fried pork.

Advertisements

Pumpkin Bread

Advertisements

Pumpkin bread is another simple way to use up any extra pumpkin you may still have. I roasted my pumpkins before I blended it into a puree for these pumpkin recipes. This bread has lots of seasonal flavor and is very easy to make. This bread has good moisture, a good bread/cake texture, and is not overly sweet. I was able to make 3 loaves from this recipe, however, I only filled my pans half way, so if you want bigger loaves, just fill your pans a more, but leave about 1/2 an inch for expansion. This bread is also very similar to a zucchini bread, just with pumpkin and with festive spices!

What You Will Need

  • 4 Cups Pumpkin Puree
  • 4 Eggs
  • 4 Cups Flour
  • 3 Cups Sugar
  • 1 Stick of Butter (1/2 Cup), Melted
  • 1 Cup Oil
  • 3 Tbsp Cinnamon
  • 1 Tbsp Nutmeg
  • 1/2 Tbsp Cloves
  • 2 tsp Baking Soda
  • 1 tsp Baking Powder
  • Standard Bread Pans
  • Non-stick Spray
  • Mixing Bowl

Directions

1. Heat oven to 325 F. Spray bread(s) pan with non-stick spray then coat with flour. In a mixing bowl, creme together sugar and butter. Once combined, begin adding oil and eggs slowly. Add your spices, baking powder, and baking soda, then slowly mix in flour, and finally, mix in your pumpkin and stir until fully combined.

2. Fill bread pans to 1/2 to 3/4 full. Bread will not rise much. Bake bread for 65-70 minutes until tester comes out clean. Remove from pan and let cool to room temperature. Once cooled, eat within a week, or wrap with two layers of cling wrap before freezing.

Advertisements

Spinach Pasta with Savory Bechamel Sauce

Advertisements

Adding Spinach to your homemade pasta makes a beautiful pasta, and is a great way to add more veggies to you and your families’ diet. I made this with fresh spinach, boiled it for 4-5 minutes, strained it, squeezed out any additional water, then chopped it before adding it to my pasta ingredients. I did mix the pasta with the bechamel, however in the future I should have just poured the sauce on top. This sauce is very rich and can make the dish soupy. Also, mixing it together covers the beautiful homemade noodles. These spinach noodles do not have a different flavor from other homemade noodles, they just have a different appearance. This recipe makes 6 adult servings of pasta.

What You Will Need

  • 2 Cups and 4 Tbsp Flour
  • 2 Eggs
  • 1 Cup Boiled Spinach
  • 4 Tbsp Oil
  • 4 Tbsp Butter
  • 1 Onion, Diced
  • 2 Garlic Cloves, Minced
  • 2 Cups Milk
  • 4 oz Sharp Cheddar Cubed
  • 1/2 Cup Shredded Mozzarella
  • Rolling Pin
  • Medium Sauce Pan
  • Large Sauce Pan

Directions

1. In a large mixing bowl, add the first half of flour, eggs, and spinach. Begin to combine, slowly add oil as needed until the pasta comes together. Roll out into a thin layer, sprinkle with flour, roll, then cut to 1/4 inch thick noodles. Straighten out noodles and set aside.

2. Fill large sauce pan with water, place over medium high heat and bring to a boil. Place medium sauce pan over medium heat, add butter, onion, and garlic. Once onions are sweating, add second half of flour, then stir and cook for 2 minutes. Add milk, stir constantly and bring to a boil. Add cheese and stir until cheese melts, remove from heat. Add pasta to large sauce pan of boiling water, boil for 4 minutes. Strain. Plate pasta, then top with cheesy bechamel.

Advertisements

Freezing Pumpkin Pies Before the Holiday

Advertisements

Pumpkin pie is delicious and a classic dessert for this time of year. If you plan to have pumpkin pie at your holiday meals this year, look no further than this recipe; it makes 2 pies, and you can freeze one or both. These pies take some time to make, so save some during the holiday by making these pies early. This recipe also makes lots of pie filling. You could probably even make 3 pies with the amount of filling this makes! With my extra filling, I made some mini custards that I can enjoy in the meantime.

This recipe is straight forward. The only important thing to note with this recipe is that these pies shouldn’t stay frozen for longer the 1 month. Their quality will begin to get worse after that time, so if you make these pies the week of thanksgiving, the second pie will only just make it until Christmas before the quality starts to get worse. Or, you could choose to do what I am doing, and gift the second pie to a family member if you can’t see them for the holiday. If you choose not to freeze these pies, they last one week in the fridge. If you freeze your pies, you should thaw them for at least 12 hours in the fridge before serving!

What You Will Need

  • 4 eggs
  • 4 cups Pumpkin puree
  • 4 tsp Ground Cinnamon
  • 1 tsp Ground Nutmeg
  • 1 tsp Ground Ginger
  • 1/2 tsp Ground Cloves
  • 1 Can Evaporated Milk
  • 1 Can Milk
  • 2 cups Brown Sugar
  • 2 Tbsp Flour
  • Pinch of salt
  • 2 Pie Crusts (Homemade recipe here)
  • 2 9in Pie Pans (disposable is best)
  • Aluminum Foil

Directions

1. Heat oven to 450 F. In a mixing bowl, beat your eggs. Add Pumpkin, Spices, Milk, evaporated milk, brown sugar, flour, and salt, then mix until blended.

2. Place pie crust into pans. Fill 1/2 to 1 inch from top of pastry. Line edge with foil. Place on large baking sheet and bake for 10 minutes before reducing heat to 350. Bake for 40-50 minutes, remove foil, then bake for another 10-20 minutes, or until tester comes out clean. Let cool for 2-3 hours. Wrap twice with cling wrap, being careful to not touch the top of the cake, then wrap with aluminum foil before freezing.

Advertisements

Website Powered by WordPress.com.

Up ↑

Design a site like this with WordPress.com
Get started