It’s been a while since I’ve updated on how the house is going. So far we haven’t been able to do any more new flooring. The holidays and winter in general has made it hard for us to continue that project. Our next flooring room will be to add the new flooring into the orange room’s closet, then we’ll be doing the hallway and hall closet as our second segment. We are still trying to make decisions on whether we can do the living room and dining room together or whether we have to add a threshold, or if it would be easier to add one. Our living room is about 14 ft by 16 ft, and our dining room is about 9 ft by 7 ft.
Otherwise, we have been working on projects. We’ve updated our kitchen light, dining room light, and hall light. We’ve also bought a new bathroom faucet and push drain. We were able to get these accomplished in a weekend and it was just a small project to keep us busy at home. We’ve been busy doing some work for family lately. Josh has been building a server for a business, and we’ve had a few smaller projects we’ve been dealing with. Josh also bought a 3D printer, the Ender 3 Pro, so we’ve been fiddling with that most recently.
We started this project near the end of June, and by early July we had everything done but painting the trim. Though I like to make a post whenever we do a project, I am learning to wait until the entire project is done instead of posting when everything is “mostly” done. So, the end of August, we got some exterior paint and were able to finish this project. We’ve been working on other projects almost constantly, so it was something we had to get back around to.
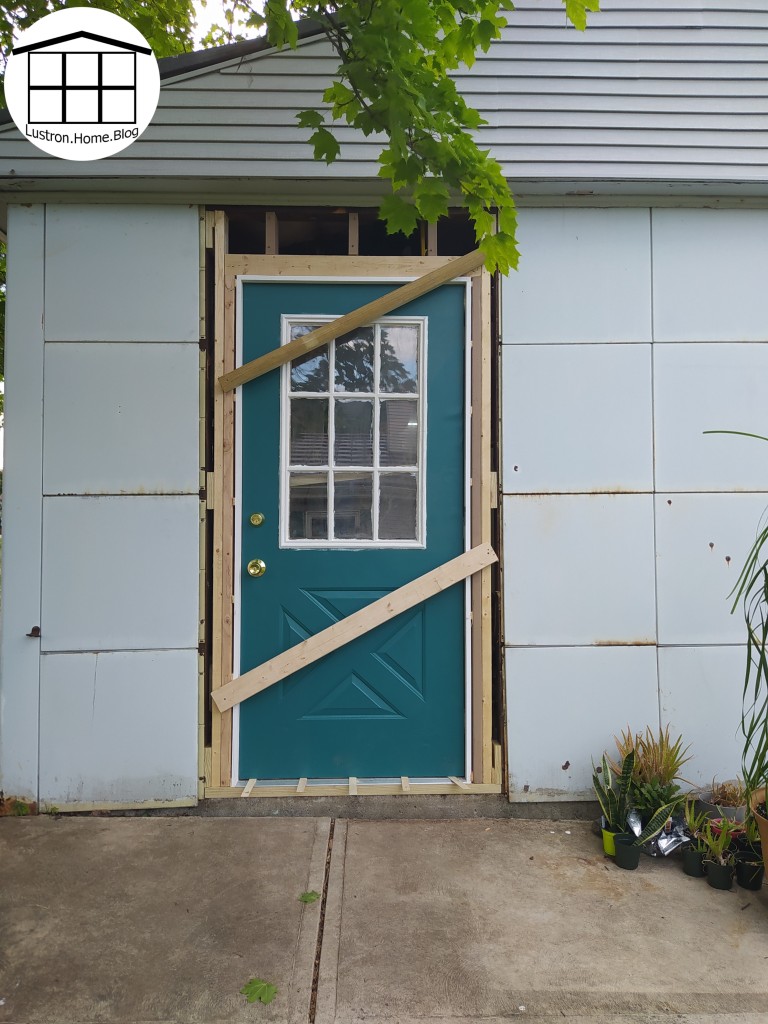
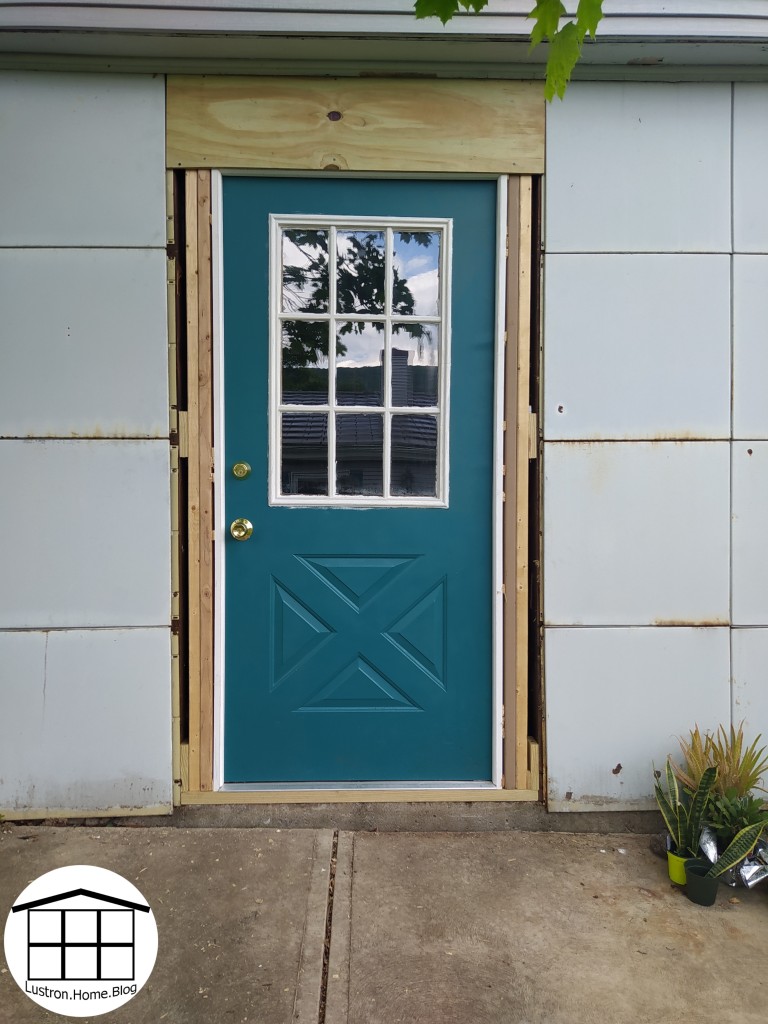
Lustron garages are similar to the house, but there are some construction differences. For example, the house is entirely steel construction, whereas the garage is all wood construction. This made it much easier for us to add the door. The panels are the same between the house and the garage. The panels are attached in only three corners, and what keeps it together is the panels being nested. from the front, the panels are bolted on the left corners and the right top corner. When the wall was assembled, it was assembled from the left bottom corner to the right top corner. The metal shingles are also the same as the house, however the roof design is different. Lustron garages were a secondary thought to this company, and most of the time were just assembled by some contractor the way they would build any other structure. For that reason, you will find must more variation between garages than houses. With that out of the way, you can look through how we added our door. We bought a previously owned steel door for $15 that came with hinges, but was not hung. We would have liked a door that was already hung, however we didn’t want to spend a fortune on a door either, so we went with what we could find, I painted it, and we attached to a door frame that we made ourselves.
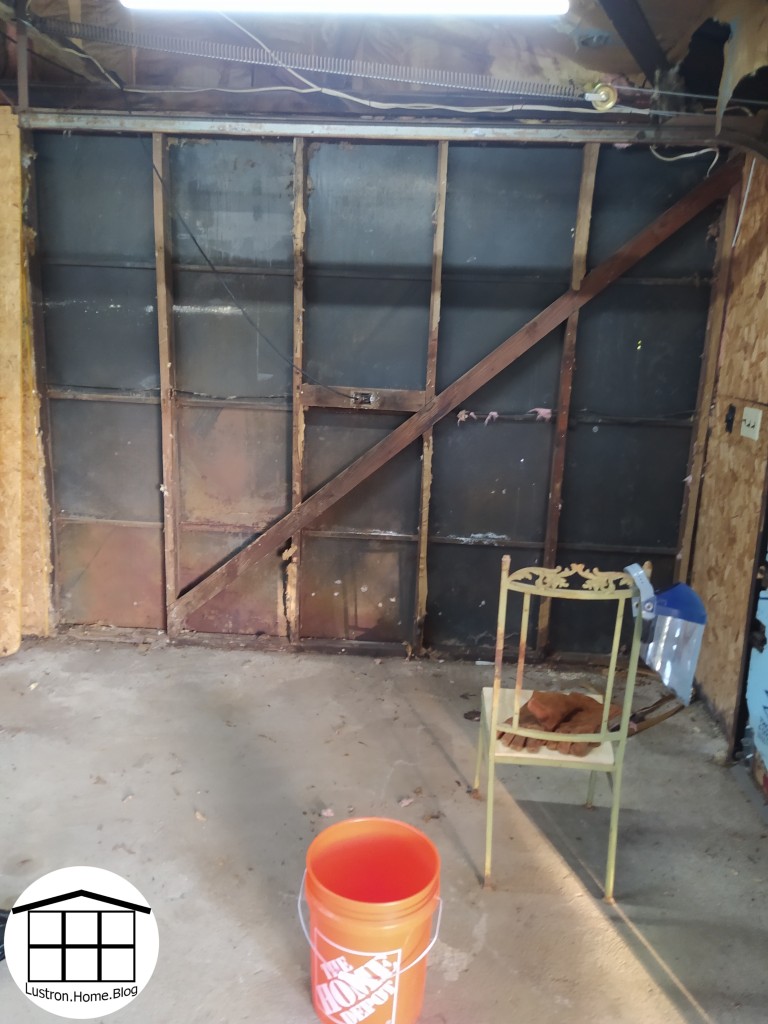
The first thing we did was figure out where-ish we wanted our opening. We had originally planned to more the door so there were two existing panels between the door and the corner. We knew we’d have to move our electrical if we did that, but there would be enough room for the upright freezer and some storage shelves. When we pulled down the wall and could see the footer, there was already an original foundation anchor in it, and though we may have been able to remove it, we didn’t want to mess with the original structural integrity. Before you pull down your wall, you will need to find your studs, but once you do, you can tear out anything in the wall, in our case it was insulation, and clean your work space.
We decided to move the door a segment to the left, and Josh began cutting. As I mentioned earlier, since the panels were assembled a special way, we had to disassemble a special way. Using a sawzall, Josh was able to fit the blade between the panels and studs to cut the bolts. Once all a panel’s bolts were cut, it could just slide right out. We did end up damaging a few panels this way, but many of these panels were severely rusted and some even rusted through. Once that was done, we cut out the existing stud and cross support, and cut the existing footer in the door way to make room for a new threshold.
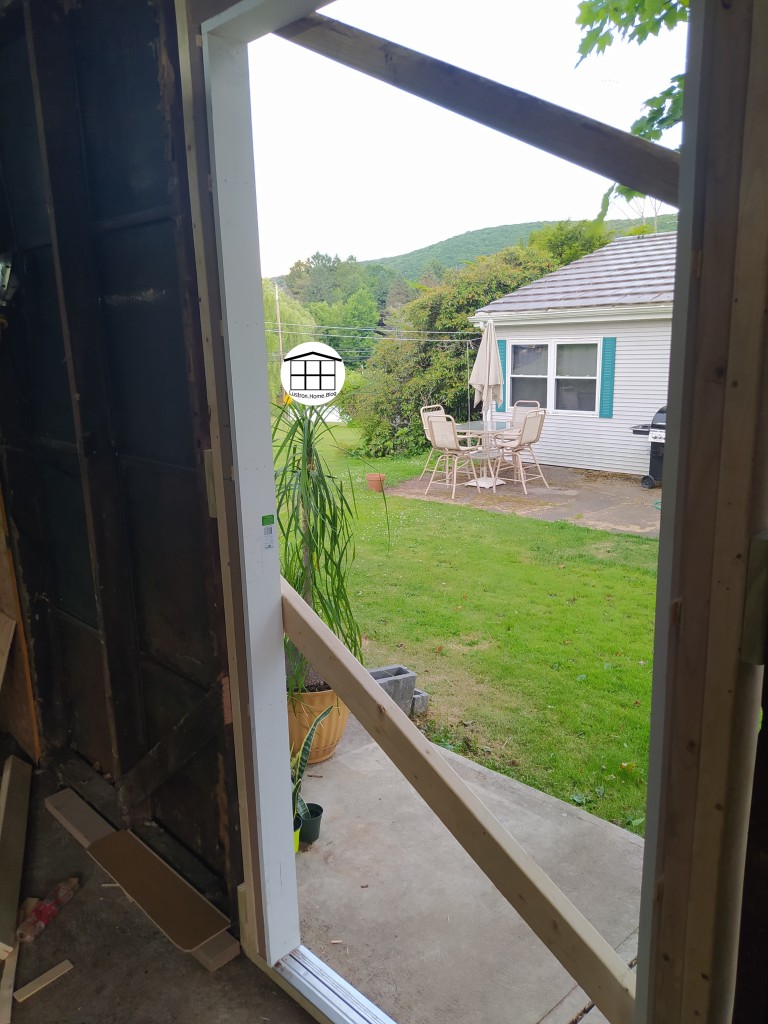
Once the opening was done, it was all framing and adding the door. First, we added our threshold, and added on anchor into the cement. Then we rough framed the door. We gave ourselves an extra 3 inches for the door and roughed in the opening. We made spacer blocks then added our 2x4s up to the header. There we added shorter 2x4s that were slightly higher than the door, and nailed them to the existing 2x4s. This whole time before we nailed anything, we were adjusting the boards to be as close to level and as close to square as we could get. We added a top plate to the shorted boards and attached it. We added some smaller pieces to attach that to the actual header, then we called it a day because our we found out our well switch had broken (thankfully we keep a spare). We added plywood for the night and got back to it a few days later. We then cut the door frame, cutting the sides before the top, shimmed it in place then nailed it. We added our final threshold and then we took a few more days off before returning. When we came back, we hung the door. First, holding the door where it would be if it were open, we marked the hinge locations. We had enough room that we didn’t have to set in the hinges, but you may have to do that if your space is too tight. Josh pre-drilled the holes, and I held the door as he attached each hinge.
Josh then cut our top trim piece and mounted it, then he cut and mounted each side piece. We added new hardware to the door, and spray foamed around the framing of the door. We left it like that until I was able to paint the trim to finish the project.
It all started with my Starting Point post. There I wrote my initial thoughts and ideas for this house as recorded last November. We bought this house and found many things wrong with it. We starting putting work into the house starting last October/November, and below is what we were able to accomplish so far.
Current Progress
As you can see just between the first set of photos and the second, we’ve made some big changes. We removes trees and bushes, put in raised beds, added an exterior door on the garage, and changed the accent color on the house from red to teal. Inside, we removed a lot of the latex paint off the utility room walls, we built and removed our builtin pantry, and installed a storage shelf instead. We removed the broken dishwasher and sealed the space to be used for my canning stuff. We also upgraded the light in the kitchen, painted cabinets, remove the old range microwave and added a new range-hood, as well as replaced the old leaking kitchen faucet. In the dining room, we refinished the wall after removing about 1/3 of the wallpaper in the house, and we also created a lampshade for our single handing bulb from a lantern we used at our wedding reception. We haven’t done too much to the living room yet; we added a projector screen and are mainly using it for storing some of our extra stuff until we finish the master bedroom. We replaced the light fixture in the hall, and upgraded all the light switches in the house to the rocker style. We repainted the bathroom, removed the medicine cabinet, changed the light fixture, and painted the vanity and changed the hardware. We also added a new shower curtain to match. In the original green room, due to it’s carpet color, we originally replaced the floor in the closet with vinyl planking. After seeing how easy it was, we took on the task of redoing the entire rooms floor, which was not an easy task. we remove the wood from the closet to be replaced with matching floor eventually, I also painted the bedroom the two shades of orange, we moved in, and that is the state of our orange room. Finally, our current project is the master bedroom, or our new green room. We just finished laying the flooring on Saturday. There is still a lot of work we want to do in that room before the new unveiling, but I hope this helps build some excitement for the next unveiling, which will be coming in the next two weeks or so.
A Year’s Worth of Projects
A year is so long, yet so short. We were able to accomplish so much because of the blessing we’ve received this year and from taking things in stride. We are happy for our new experiences and are content with this house even as we continue to find more problems. We aren’t sure if we’ll keep this house forever, but we are happy for all the good things this house is providing for us. This Lustron gives my husband and I something to do together, to bond over, and to dream for. We hope for nothing but the best for this house in the future, and we hope our fingerprint on this house improves the beauty of this old Lustron, rather than hinders it’s potential.
For more on our home improvement posts from this year, feel free to check out any of this posts below. If not, I’ll see you again soon!
This weekend, Josh and I went to a new liquidation store a few towns over. While we were there, we were looking at their light section, and we had talked many times about how bad our lighting was and how our fixtures didn’t match what our styling was. On top of this, this store had a good selection, and we were able to get the ceiling light for $23 and we bought their last one, and the wall sconce was only $8.
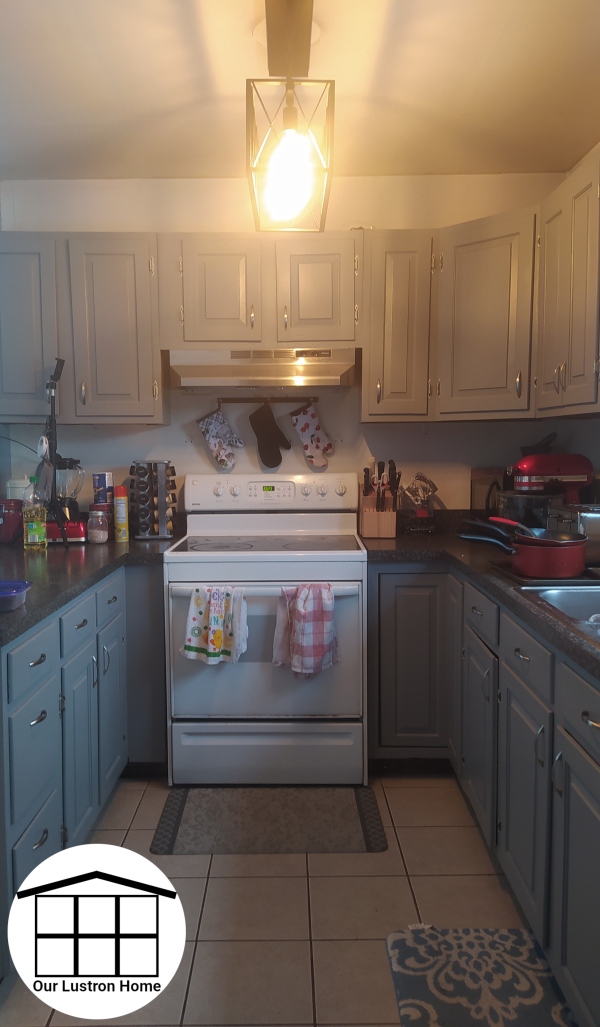
After that, we finished our Christmas shopping, and crashed for the night. On Sunday, we had to run out to Home Depot to get the 13 watt bulbs needed for the kitchen, and boy was it worth it! Josh spent to rest of the afternoon putting up the lights. It was kind of weird since the ceiling light needed the ground attached to the bracket before it attaches, so I had to hold the light near the ceiling while Josh attached the bracket. Also, it was nice to find light boxes in the ceiling and wall, since we didn’t have one behind our medicine cabinet. The light box in the ceiling isn’t attached to the ceiling at all, but the wires attached through a smaller hole, so there is no risk of that falling. The original kitchen light also had insulation underneath the plate. Though that was the case, we installed the new light without insulation, with the thought that we can always add some later if we so desire or need.
The wall sconce however was a complete disaster trying to install. Originally, Josh thought that would be the easy one, and the ceiling light would be hard, but it was quite the opposite. First, we had to paint it, because it had an oiled brass finish, and we decided it would look better in nickle. But, the problems began shortly after. There was a light box behind the wall sconce, however it sticks out of the wall by about an eighth of an inch. So, the whole fixture is away from the wall a bit, but everything is weird about the design of the fixture. The bulb screws in toward the bottom left edge of the glass, and to not see the bulb, the bulb has to be twisted toward the right. So, the light is uneven, which can be seen a bit in the lit photo below. Also, nothing aligned with the new sconce. A bolt on the back hit the edge of the box making it stick out more, and the ground screw on the mounting bracket also prevented the light from laying flat. So, Josh had to switch brackets, and grind down the light box, making it so the light was nearly even with the wall.
Overall, things didn’t go as we had expected them to, however, they both turned out well nevertheless. The lights take a second to turn on in the kitchen and though we will probably change the wall sconce again in the future, it turned out well in the end. What do you think of the new fixtures? I’m excited to make a new recipe in the kitchen to show off my new lighting soon!
If you enjoyed this article, Please feel free to follow me or subscribe for more updates!