2021 March Gardening Update Zone 6A

Advertisements

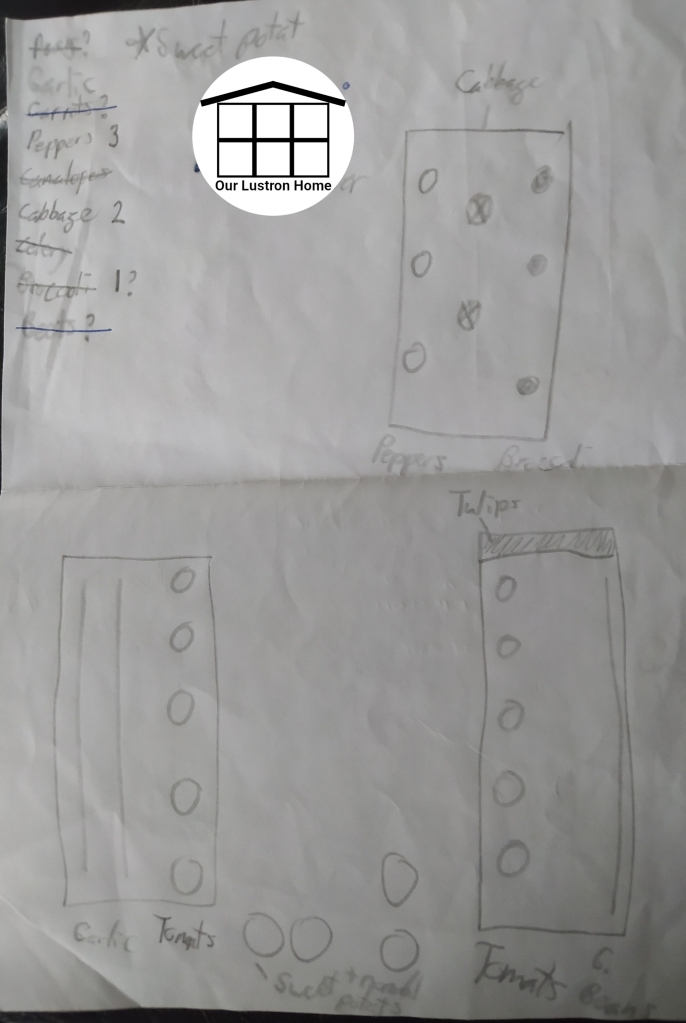
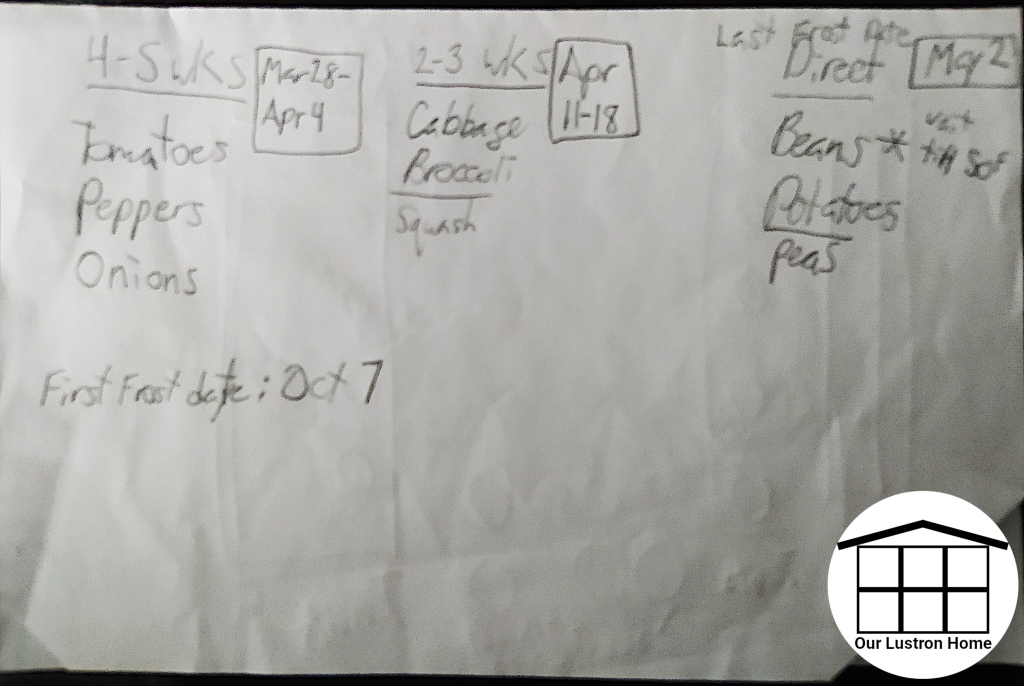
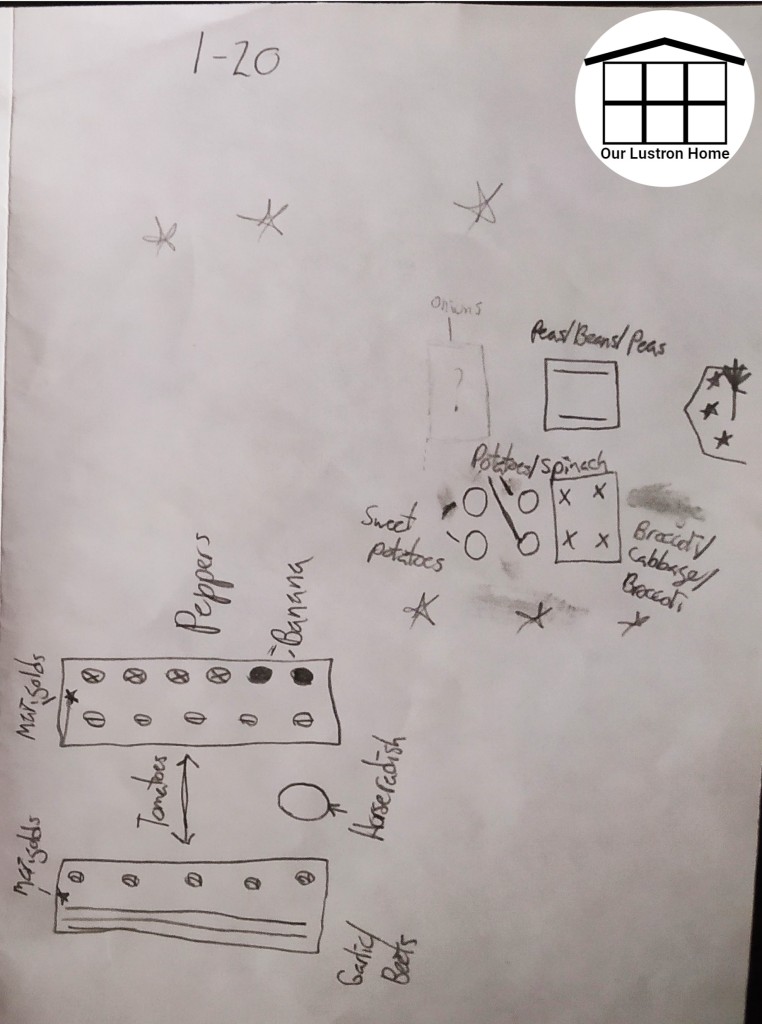
Starting my garden is always something I get super excited for and plan for months. If you would like to see my last post about what I planned to do in the garden this year, you can check it out here. I have only made a few alterations at this point, so that post is still mostly accurate. I’ve also gone through and made a calendar of when to start seeds, when to plant things outside, and when to pull plants for the next crop to come in. I live in zone 6A, so March is about as early as I can start planting.

Advertisements

I guess the first thing I’ll do is go through my timeline a bit. The first thing I did this year was start growing a sweet potato. I bought an organic sweet potato at the store about three weeks ago, covered it half way with water and now have is half submerged on the top of a mason jar. Within about 10 days, roots began to grow, and now at about 20 days, I’m beginning to get my first sprout off the top. I would like to get at least 6 slips, but I’d be even happier with 9 to 10. Sweet potatoes get planted after all my chance of frost is gone, so I still have until early June for more growth.

Next, I started some broccoli seeds. I kept them moist, and within 2 days, most of my seeds had sprouted. I started my broccoli seeds about 2 weeks ago, and they should be ready to transplant out the first weekend of April. These seedlings are now about 1 inch tall and are starting to form their fist set of true leaves.

This weekend was very busy. Friday we bought four 2″ by 10″ by 8′ to make another raised bed. With that we bought six 2″ by 2″ by 8′ boards to make two trellis, six bags of Black Kow Manure, and one 3 cubic foot bag of peat moss. Saturday morning we assembled the raised bed, and went to get 7 full wheelbarrow loads of dirt. We filled the bed half way with dirt before we dug a trench to bury hay down the length of the bed. We then covered the hay, added a bit more dirt, then added half the manure and peat moss and mixed the top layer all together leaving the hay untouched.

The hay we pulled from the covering the garlic and is used as a way to help regulate moisture in the bed and hopefully help keep it from drying out too much. Once the bed was filled and mixed, we added the remaining manure and peat moss to the remaining dirt. We also had some chicken waste and bedding, so we mixed it all together in the bed of a truck before filling the wheelbarrow and then filling the fabric pots. That was the last thing we did in the garden on Saturday.

Advertisements

Sunday, I planted some daffodils in the garden along the garage, and I added some mulch to the tulips I planted near my old raised beds. I’m glad to see they were coming up. I planted a horseradish crown in the fabric pot by itself, and I checked my garlic. I was very very happy to see that all my garlic did come up and that two cloves even split so I should be getting about 37 cloves of garlic this summer! After that, I checked my potatoes, and I planted 4 rows of peas. I then made two trellis out of 2″ by 2″ boards and attached them to the bed between each set of pea plants.

What’s left for March? Still lots! Today I will be going out to add some spinach in between the peas and soon to be broccoli. Next weekend, I should get to plant my potatoes. I have 13 potatoes that should be good enough to plant, so I will be planting them between 3 fabric pots. At that time, I will also be able to start my peppers and tomato plants. I also only have about a week to figure out how I’m going to make the trellis roping. I’m going to be looking for some 100% cotton string/yarn, then I need to decide between nails, brad nails, screws, staples, etc. for attaching the string.

Advertisements

Overall my plans haven’t changed too much. We decided to place the new bed to be towards the front of the peach tree, and we decided on only one bed instead of two. The larger beds are a bit harder to work around, but I also didn’t want to have to play with spacing two beds and limiting lumber use is also important to me. Also, we decided to do only one fabric pot of sweet potatoes and three for normal potatoes. I wasn’t expecting so many potatoes to be good to plant, but we eat them enough that we found it justified to plant as many potatoes as we have. We’ll also try planting some sweet potatoes in the ground and see how that goes. Finally, I also managed to get my hands on a good large chunk of horseradish root I found on Etsy from Daylilynursery.

For those wondering, that means I now have three types of garlic: Chesnok Red-Purple Stripe, Amish Rocamble, and Inchelium Red (softneck). I started eighteen Waltham 29 broccoli seeds. I planted a bareroot horseradish root. I planted thirty-four Golden Sweet Pea seeds. And today, I’ll be planting 1-2 rows of American spinach.

Advertisements

Homemade Pasta and Pizza Sauce

Advertisements

This homemade pizza/pasta sauce is a great way to use up any veggies you may have while also making a hearty and delicious sauce. Below is how I made my sauce, but substitute in what you have! Add some blended beans or spinach, or just stick with meat, tomatoes, and season with salt and soy sauce. I used 1 quart of diced tomatoes, and one can of fire roasted tomatoes to add extra flavor. The mushrooms add extra savory elements to the dish, and if you want to have some diced in the sauce it adds great pockets of flavor. I ended up boiling my sauce for 1 hour to thicken it a bit, but it could still be considered too thin to your taste. The recipe below makes about enough sauce for 5-6 pizzas, or enough sauce for 8-10 servings of pasta.

Advertisements

What You Will Need

  • 1 lb Sausage
  • 2 Carrots, Finely Shredded
  • 2 Celery Stalks, Finely Shredded
  • 12 Oz Mushrooms
  • 1 Cup Water
  • 1/2 Onion, Finely Diced
  • 1/2 Bell Pepper, Finely Diced
  • 6 Cups Diced Tomatoes
  • 2 tsp Salt
  • 1 Tbsp Soy Sauce
  • 1 Clove Garlic, Minced
  • Blender and Grater
  • Dutch Oven

Directions

1. Add sausage to a dutch oven over medium heat. Prepare the veggies, and add mushrooms and water to blender and blend. Once sausage is browned, add the onion and pepper and cook until onion is translucent. Add the carrot, celery, and mushrooms and cook until hot. Add tomatoes, salt, soy sauce, and garlic, and simmer over medium heat until sauce begins to become thick.

Advertisements

Garlic Butter Venison Chops with Roasted Butternut Squash

Though butter is usually seen as unhealthy, butter is great at bringing flavor, and oil is important for a healthy diet. I roasted my squash plain and served them as they came out with just a spoon to remove the cooked flesh inside. The chops and pasta were easy to make and were ready with less than 20 minutes of active cooking. In the recipe below, you’ll see I used pre-minced garlic stored in oil. It is important to note that with the quantity given. Garlic stored in oil still has a garlic flavor but it is much weaker than fresh garlic. If you use fresh garlic, 1/2 a clove will be more than enough to get the garlic flavor without scaring off anyone who may have to be around you! I cooked 4 venison chops with this recipe, so there were 4 servings. If you would want to cook 6-8 servings, adjust the recipe accordingly.

Advertisements

What You’ll Need

  • 1 Butternut squash, Quartered and Cleaned
  • 12 oz Egg Noodles
  • 4 Venison Chops
  • 4 Tbsp Butter
  • 2 Tbsp Minced Garlic in Oil, or 1/2 garlic clove, minced
  • Baking Sheet
  • Large Frying Pan
  • Medium Sauce Pan
  • Colander

Directions

  1. Heat oven to 400 F. Score the underside of the squash and place skin side down on a baking sheet. Add salt, honey, or brown sugar as desired. Baked for 60 minutes total.

2. With about 20 minutes left of cooking, fill saucepan 3/4 full with water and place over medium heat. Place the frying pan over medium heat and let heat.

3. With 10 minutes left, add the egg noodles. Stir and cook according to package, about 6-8 minutes. Add about 2 Tbsp oil to the frying pan, then add the chops. Cook 4 minutes on the first side, then flip. After you flip, add the butter until it is mostly melted, then add the garlic. Stir often and continue to cook until the garlic turns golden, or another 4 minutes has passed. Serve Chops and butter over the noodles.

.

Pork Ramen

Advertisements

Ramen is a classic Japanese dish that is flavorful and incredibly filling. Ramen has 3 main elements, the broth, the noodles, and the toppings. all three elements add flavor to the dish and make a bowl of ramen what it is. And though the broth and the noodles bring amazing flavor to the dish, the toppings are the real star of the show. For this bowl, I used red pepper flakes, sesame oil, and fish sauce. The red pepper flakes made this dish interesting. It started out tame in flavor, but the more that the flake got moved around the broth and dish, there was a surprise heat in some bites, while none in others. In the same way, the oils would be present in one bite, and absent in another. The rich savory toasty flavor of the sesame oil and the smooth slightly fishy flavor of the fish sauce, brought depth to the dish and great flavor. Other than that, my pork broth was a bit weak, so I added some beef bouillon and 1/2 a chicken ramen packet (as my MSG). I also used the leftover homemade noodles I had posted about yesterday. Since they were already cooked from then, i simply had to boil them for 3 minutes to heat up, then I strained them and plated. This recipe makes 3 large bowls of Ramen, and it heats up well the next day.

Advertisements

What You Will Need

  • Pork stock (homemade or store bought)
    • Pork Bones
    • Water
  • Pork Chops
  • 2 Beef Bouillon
  • 1-2 tsp MSG
  • 1 Onion, Sliced
  • 1 Clove Garlic, Minced
  • 1 Can Sliced Mushrooms
  • 1/4 cup Soy Sauce
  • 1/4 cup Worcestershire sauce
  • 1 Tbsp Ginger Paste
  • 12 Oz Pasta
  • Dried Red Pepper
  • Diced Chives
  • Dried Parsley
  • Sesame Oil
  • Fish Sauce

Directions

1. If using store bought stock, skip to step 2. To make pork stock, Add bones to a pot and cover bones with water bring to a boil and simmer for 20 minutes to remove impurities. Strain off the water and just cover the bones with water and simmer for 4 hours covered. Reserve the broth and discard the bones. Save any meat that may have stuck to the bones and add to the broth. Store in fridge covered or use immediately.

2. Begin by cooking the pork chops in a large skillet. Cook 3 minutes per side, remove from pan, and cut into strips to top the ramen. Fill a large sauce pan 3/4 with water. Place over medium high heat to boil. Add the broth to the hot skillet, and add in the onion, garlic, and optional beef bouillon and MSG. Once simmering, add mushrooms, soy sauce, worcestershire sauce, and ginger. Taste, then season as needed. Once the water is boiling, cook pasta as directed on package. Strain.

3. Plate the ramen by making a nest of noodles. Top with onions and mushrooms and place a cut pork chop over the top. Cover with broth. Finally, sprinkle each bowl with pepper flakes, chives, and parsley, then drizzle with sesame oil and fish sauce.

Advertisements

Garden Planning 2021

Advertisements

I’ve been planning my 2021 garden since fall and have altered the plans several times. It’s important to keep a record of your plans, and I so far have 5 sketches for my 2021 garden dating back to September. This year will be my second year with a garden, and I’m planning for a 3 season garden. This means I have plans for all seasons, Spring, Summer, and Fall, and plans on what goes well together and what will go in once one stops producing. With this planning also comes many decisions. I have decided to start everything from seeds except what doesn’t use seed. I have also decided to use two new small raised beds and to use two more fabric pots than last year, however since I flipped the beds this fall, I only have one of the five bags I need filled. I’ll also be figuring out how to fill them early this spring. The soil is very compact here and not very fertile. We do have a compost bin, but it is much too small to be a hot pile, so though there is some dirt at the bottom, it will take a very very long time before I’ll get any significant compost from it.

Advertisements

The Plans

As I mentioned these plans have changed and evolved over time. The first things I did when planning my garden were to make a list of all the vegetables we eat a lot of and we feel would be a fun challenge for the next year. I also sketched out a layout for the garden. Then I began to place the plants I really wanted into the sketch accounting for plant spacing. Then, when you get to your last few plants you have to make the decision of what you want to plant this year. Take into account, how much you currently have stored, how often you eat it, and if you will have the means to store certain vegetables over an extended period of time.

Advertisements

Once your vegetables are picked, you can tweak your plans over the span of a few weeks. However, when you finally are set on what you plan to grow, be sure to order seeds! Seeds are in a higher demand than normal and it could take a while to get seeds or for them to come back in stock. Beyond that, it will just be deciding when you can plant things, and what can be planted once one plant is ready to be pulled. For example, I already have my garlic in the ground and it came up before the hard freeze came, so I know that will be planted until late July when it will be time to harvest. After that, I will plant beets. I denoted that by a “/” on my sketch. I have several other plants I will be doing that with, I plant to plant Peas, once it gets warm, pull the peas and plant green beans, then come August/September, I’ll be able to plant a second planting of peas. I’ll be doing the same thing with my second new bed, but with two plantings of broccoli and one planting of cabbage. I also Plant to plant potatoes once the ground is warm, and once they are harvested, I will be planting Spinach in the fall. I am in zone 6A, so my timeline will likely be different than yours, however I hope you were able to get some helpful information.

Some possible questions you may have, I’ll try and answer before hand, but feel free to ask any questions you might have down in the comments. I’ll just hop into it. The circles not within a rectangle/square are my fabric pots. I plan to plant one with horseradish, two with sweet potatoes, and two with potatoes and spinach. The rectangles on the left side of the page are 4ft x 8ft beds that are 12 inches deep. These are the beds I started with last year. The square beds on the right of the page will be 4 ft x 4 ft beds, though they have not been constructed yet. There is also a possibility for another 4 ft x 8 ft bed for onions, but that will only happen if the cost of lumber comes down significantly before May. Most people in my area have a consensus not to plant anything in the ground before Memorial Day, however, plants like peas and broccoli are very cold hardy, so their spring planting will probably go into the ground beginning to mid-May. The picture above of dates and veggies underneath will be the days I will have to start my plants inside. For them, I will probably be starting them at the end of the time frame, just so they don’t get too big, if I do have to wait until mid- or late May before planting. What else… I will be planting two rows of tomatoes, and I’ll be doing one variety per row. I will also be planting both banana peppers and bell peppers in my pepper row. I have tons on Marigold seeds, so I’ll be starting them in every flower bed around my house, and I also learned to get them in the ground super early, or they won’t sprout. I learned the same with dill last year.

That’s all I can think to clarify. If you have any questions or comments, feel free to comment below! Thanks for reading!

Advertisements

Website Powered by WordPress.com.

Up ↑

Design a site like this with WordPress.com
Get started