It’s been a while since I’ve updated on how the house is going. So far we haven’t been able to do any more new flooring. The holidays and winter in general has made it hard for us to continue that project. Our next flooring room will be to add the new flooring into the orange room’s closet, then we’ll be doing the hallway and hall closet as our second segment. We are still trying to make decisions on whether we can do the living room and dining room together or whether we have to add a threshold, or if it would be easier to add one. Our living room is about 14 ft by 16 ft, and our dining room is about 9 ft by 7 ft.
Otherwise, we have been working on projects. We’ve updated our kitchen light, dining room light, and hall light. We’ve also bought a new bathroom faucet and push drain. We were able to get these accomplished in a weekend and it was just a small project to keep us busy at home. We’ve been busy doing some work for family lately. Josh has been building a server for a business, and we’ve had a few smaller projects we’ve been dealing with. Josh also bought a 3D printer, the Ender 3 Pro, so we’ve been fiddling with that most recently.
It all started with my Starting Point post. There I wrote my initial thoughts and ideas for this house as recorded last November. We bought this house and found many things wrong with it. We starting putting work into the house starting last October/November, and below is what we were able to accomplish so far.
Current Progress
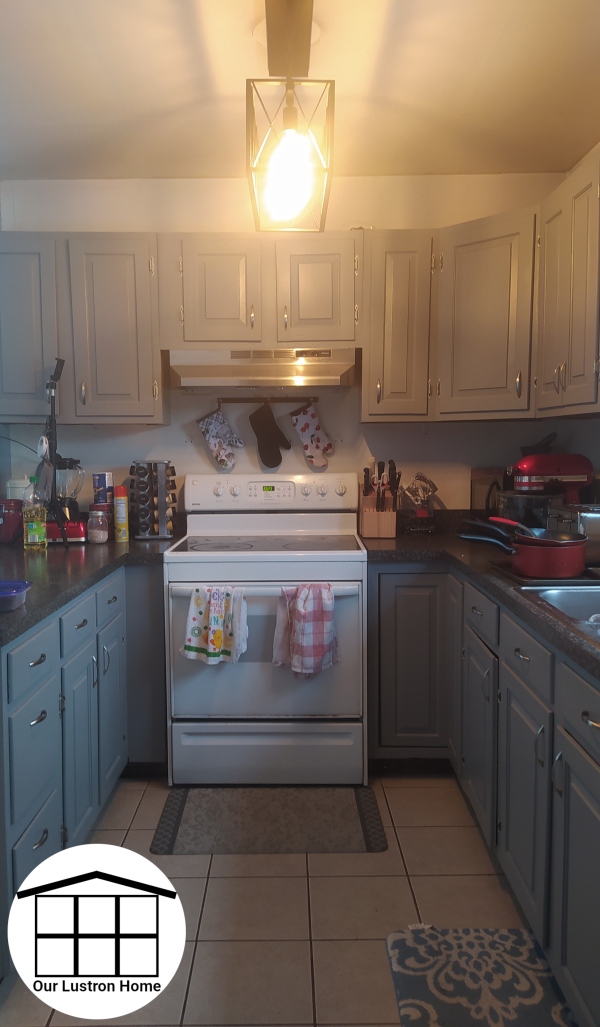
As you can see just between the first set of photos and the second, we’ve made some big changes. We removes trees and bushes, put in raised beds, added an exterior door on the garage, and changed the accent color on the house from red to teal. Inside, we removed a lot of the latex paint off the utility room walls, we built and removed our builtin pantry, and installed a storage shelf instead. We removed the broken dishwasher and sealed the space to be used for my canning stuff. We also upgraded the light in the kitchen, painted cabinets, remove the old range microwave and added a new range-hood, as well as replaced the old leaking kitchen faucet. In the dining room, we refinished the wall after removing about 1/3 of the wallpaper in the house, and we also created a lampshade for our single handing bulb from a lantern we used at our wedding reception. We haven’t done too much to the living room yet; we added a projector screen and are mainly using it for storing some of our extra stuff until we finish the master bedroom. We replaced the light fixture in the hall, and upgraded all the light switches in the house to the rocker style. We repainted the bathroom, removed the medicine cabinet, changed the light fixture, and painted the vanity and changed the hardware. We also added a new shower curtain to match. In the original green room, due to it’s carpet color, we originally replaced the floor in the closet with vinyl planking. After seeing how easy it was, we took on the task of redoing the entire rooms floor, which was not an easy task. we remove the wood from the closet to be replaced with matching floor eventually, I also painted the bedroom the two shades of orange, we moved in, and that is the state of our orange room. Finally, our current project is the master bedroom, or our new green room. We just finished laying the flooring on Saturday. There is still a lot of work we want to do in that room before the new unveiling, but I hope this helps build some excitement for the next unveiling, which will be coming in the next two weeks or so.
A Year’s Worth of Projects
A year is so long, yet so short. We were able to accomplish so much because of the blessing we’ve received this year and from taking things in stride. We are happy for our new experiences and are content with this house even as we continue to find more problems. We aren’t sure if we’ll keep this house forever, but we are happy for all the good things this house is providing for us. This Lustron gives my husband and I something to do together, to bond over, and to dream for. We hope for nothing but the best for this house in the future, and we hope our fingerprint on this house improves the beauty of this old Lustron, rather than hinders it’s potential.
For more on our home improvement posts from this year, feel free to check out any of this posts below. If not, I’ll see you again soon!
I knew I would eventually need a range hood after the day I spent frying food: doughnuts, french fries, and chicken nuggets. The smoke and smell was quite unpleasant after several hours of frying, and the microwave fan wasn’t doing anything to help. I’ve had my eye on range hoods since then. With the new stimulus check, we decided a range hood would be a good thing to invest in. Beyond that one experience, I often steam up the whole house when I boil water, and I would like to be able to vent without having it stay in the room. Also with the microwave above my oven, I don’t have much room when I use my bigger pots and I would like to have a bit more head space there. I also have a nice smaller microwave from when I was in college that I could start using once I got a range hood.
The space the range hood would have to fit was 32 inches. I searched around a bit and found a 30 inch stainless steel hood that was under $60, linked here (not sponsored). The listing for the item is a bit messed up on home depot, however the link above was what I ordered and I received the 30 inch hood and not the 24 inch hood.
For now, Josh and I have decided to not vent. We’d like to get the line run before winter, but we have lots planned for this summer, so we’ll see if we get there. To remove a microwave range, you should look up your model of microwave, but we only had to remove the 2 mounting screws on the front. Once the two screws were removed, we had to lift up the back of the microwave to pull it off it’s mount. Of course we unplugged it first, and cleared the hole around the plug, so it could slide out once the microwave was down. Then, we removed the bracket attached to the wall. We had to make spacer blocks for the hood, since we wanted it to be level. We mounted the hood with 4 screws like suggested, and it was already in the configuration for vent-less when we opened the package. Mounting was difficult because it was heavy and gets heavier the longer you hold it. We also found the mounting slots to be weak and flimsy, so we screwed it into the wood by going straight through the thin sheet metal of the hood. We also used a large drill bit to drill a new hole for wires in the cabinet. This hood does not come with a plug, and they expect you to hardwire it in. However, Josh has lots of extra parts, and since he had a cable from an old laptop charger, he was able to wire on a plug and plug it in where the microwave was before. It was a bit of a long night, however, I’m extremely pleased with my new hood and am so happy to have the extra head space and bright light. We are far from finished with this project, but I’m very pleased with how it is now.
Ever since we bought the house last June, I have disliked the kitchen cabinets. The tan seemed dated and showed every stain, and the white framing was another thing I didn’t like. It took me a long time to pick the color I wanted because I wanted the kitchen to be a certain way. I wanted a dark gray that wasn’t too dark, but also was a true gray without any undertones. I did lots of looking and my local Home Depot had a Behr paint called Anonymous that I just knew was the one. We also didn’t want to buy new hinges for this project, because we’ve thought about making new doors in the future. So, I soaked the old hinges in scolding hot soapy water for 1 hour, before leaving on towels to dry another hour before painting. The paint we used was on the hinges was the same we had used on the hall light fixture, Rustoleum spray paint in the color Brushed Nickle.
First, I removed all the doors and hinges. I began scrubbing down the remaining cabinets with a mixture of hot water and comet. I then taped off the inside of the cabinets and painted them. By the time I finished my first coat it had dried at the beginning, so I added my second coat then. The next day, I added the hinges to scolding water, and began scrubbing down the doors with more comet-water mixture. I then pulled out the hinges and let them dry on a towel for an hour before taking them to the garage to spray paint. Once done, I began taping off the doors to paint only the faces. I painted only three doors that day. On my third day, I finished painting the cabinets with two layers of paint. I waited for them to dry, then hung the doors on the new hinges, and reattached the handles.
I then took a week off before starting the bottom cabinets. I had Josh pull off the baseboard for me, and I pulled off the rubber baseboard before I started. I used a bladed scraper to remove the glue residue that would stick out above the new trim. I then used wood putty on the doors and cabinets wherever there was a seam or gap, that was the end of my first day. The next day, I pulled off the hinges and doors. I began soaking the hinges. I then sanded all of the cabinets and washed them with more comet-water mixture. Once dry, I began painting the left island cabinets. I gave that two coats, then I went outside and painted the hinges. When I came in, I gave the right hand cabinets two coats and added the drawers back in. On the third day, I painted the remaining drawers. I sanded the doors where there was putty, then I scrubbed the doors with more comet-water mixture. I waited for them to dry and painted only three doors that day. On the fourth day, I painted the cabinet doors, and attached the handles to all the cabinets. And on the fifth day, I hung all the painted doors and hinges. My kitchen was painted!
The faucet has always been on the top of my project list. The existing faucet leaked where the handle attached causing nutrient build up on the sink. The faucet also caused uneven water flow (hence the head attachment), and as you can see, it’s a very low faucet. I could barely fit a sheet pan or casserole dish in to clean it, and it was incredibly hard to fill up my larger stock pot. Along with that, the water fountain to the left of the sink wasn’t working when we moved in, leaking everywhere, and looking at it’s condition coming off, it probably never did work! It was an “add a line” fixture that was meant to attach to your existing lines without having to run new piping, but it’s more gimmicky than practical.
Removing the old faucet was one of the biggest challenges that came with this project. It must have been a very long time since it had last been changed because all of the bolts were rusted and seized. Also everything was very cramped with how tight our pipes are under our sink. Besides that, Josh was also trying to be very careful removing everything in case the new faucet leaked and we would have to put the old faucet back on.
The faucet we found was only $60 on amazon, and though it’s not a name brand, it was our style, and at least half the price of any similar name brand products we were seeing (all ranging from $120-$240). If you are interested, you can find it here.
This new faucet also has buttons on the head but the buttons face the other direction. Just another quirk of non-name brand. There is a button you have to press and hold that stops the water flow. There is also a rocker switch that changes the flow from standard stream to a shower/sprayer stream. The finish is also not perfect on the new faucet, but that doesn’t really matter to us all that much. We tend to care more that it functions and will hold up for a while, and this appears to do both.
Before and After comparison
What do you think? Josh and I are doing things to hopefully improve the overall house value, do you thing this may have done that even a little? Thanks again for your time and hope to see you again soon!