Hello again. This is my first year making swags by myself, but for several years my family has been making them just for ourselves for Christmas. This can be a great option for a gift, or for a DIY home decoration. It is helpful if you have some evergreens on your property, but if that’s not the case, most neighbors won’t mind your trimming their bushes, assuming you ask first. Our property has several yew bushes, so that is the evergreen I used for my base. I also have a monstrous holly in the front yard that is easily 15 feet tall, so I trimmed it quite severely. Beyond that, you could get some holiday decorations from a craft store to stick into your swags, but that is your choice. I have a few bows from previous years, and some ribbon to make more as I want. I also added a third step to show you can also make grave blankets using this technique, and what I did with my excess cut holly. Please comment if you have any questions, and I hope you have a Merry Christmas!
Advertisements
Directions
1. Cut a variety of different branches. Cut different colored branches, different sizes, and your favorite types of branches. Once you have your variety, lay down a large tarps to collect debris. Begin separating your branches into piles starting with the biggest branches on the bottom and stacking smaller on top. Once you have a stack, add an accent branch on top.
2. Once your satisfied with the way your stack looks, use some floral wire, beading wire, or quality twine to tie together the end. Try to weave around some of the branches to keep them from falling out, and wrap around several times. Tie it off once done. Finally, add another piece of wire, but leave some space during one of your wraps, so you can use that loop to hang your swag. Add any bows or decorations you desire, trim any unsightly branches, and hang.
3. If you’d like, you can also make a grave blanket using this same pattern, just alternating directions. You can see I made one. I also had lots of holly left over, so I used it to decorate my mantle for the season.
Hey. I feel like it’s been forever since I’ve done a more casual and less scripted post. I guess that leads me to the questions I have. What do you think of the new format of my recipe posts? This is the second time I’ve altered the format for how I write these recipes in the last year. I’ve been moving more in the direction of how others do their recipe formatting. List the ingredients, and list each step with photos of that step. I also added the option to download the recipe as a recipe card. Is that helpful? Should I instead be formatting them as a whole page instead of 4×6 note card sized?
Lately, I’ve been trying to update some of my older posts a bit. I have so many more tags then a used to, and so I’ve begun adding newer tags to older posts. I’ve also been considering revisiting my older posts to remake them. My old phone had terrible photo quality, so many of my old posts were edited to remove the shake or grainy texture of the photos. I would really like to re-do many of them, but it will take some major time. Also, if I hear you like the format of these new posts, I will reformat older posts to fit the new style.
My plans for the blog are still moving forward. This week I got a tripod, so I’ll be trying that out on some older recipes. I will be posting the link to the YouTube once it’s up and I’ll be announcing it on every platform. I’m also thinking about holding off on Instagram for now. I don’t really know what to post, and when I do it’s not great engagement, which is understandable since it’s a completely different kind of website/app.
Projects right now are relatively slow around the house. We are preparing for hunting season and winter. The garlic was planted 3 weeks ago, and one of my garlic cloves sprouted after just a week, so it’s one of the few green things left in the yard. My peach tree has lost all it’s leaves overnight and we’ve had only two frosts so far this fall. My marigolds are still blooming in my raised beds, and though I’d like 2-3 more raised beds for next year, our priorities are elsewhere, so it’ll wait till the spring. Since we finished the master bedroom, no more flooring has come up or gone down. We are planning a yard sale for next summer though. Josh and I both have things we don’t need or use, so we plan a yard sale and a couple family picnics next summer since most family members haven’t seen the house since we moved in 15 months ago.
This virus has been pretty hard for us. We think we may have had it in May, but it’s impossible for us to know with all the testing being so limited where we are. With the second flu season coming, we are exposed to more people who are sick and it seems impossible to know who has it, and if you can even get it twice. When we were sick in May, we were mostly asymptomatic. I had a fever and a cough, and Josh didn’t even have that. However, when my mom got sick she was sick. And, this weekend I lost a Great-Great Uncle to the virus. He did have many existing issues and he’s been holding on for a while, but he got sick from a home nurse and that was it.
What a crazy time we live in. I wonder who will be looking back at our writings someday and what will they say or feel about this. It’s crazy in the U.S. right now, but at the same time, everyone is still just trying to live. For some, life has gone completely back to normal, while others are in a completely new situation and just trying to get their bearings. For some, their business is booming and has never done better, and for others their dream has been crush with lock downs and regulations they just can’t meet. Jobs, families, businesses, so many things affected. It stinks that so much bad is happening to so many people right now. However, I am very thankful for what I have. Things haven’t been easy with friends and family getting sick, being trapped inside with limited interactions with the world, and watching helplessly as we can just wait. But, we are thankful for what we do have. We are thankful for the changing seasons, for the warm days and the rain, for the food in our stomachs, and for the coming opportunity to once again fellowship with others when we are allowed to. Look forward to the future. Make goals and dream. Don’t stay in the sorrow of right now and instead look forward to the spring. This is just another season in life.
If you’ve been following for a while, you may remember that at the beginning of quarantine, my husband and I bought flooring. We bought enough flooring for the entire house, and if you want to read more about that, you can find it here.
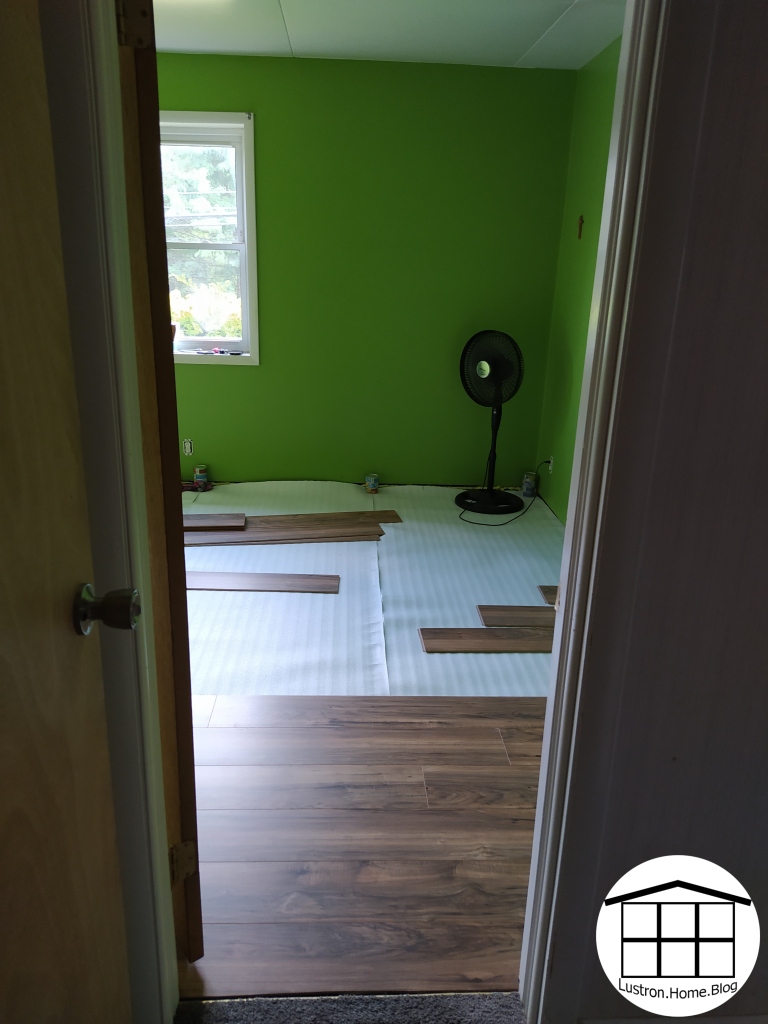
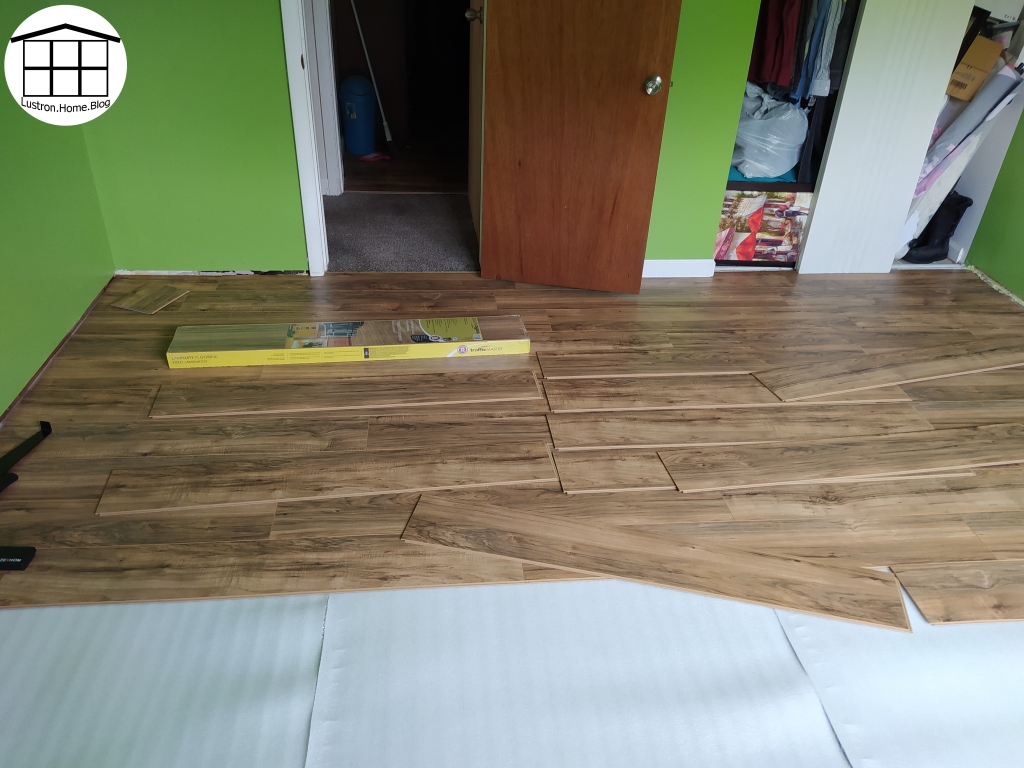
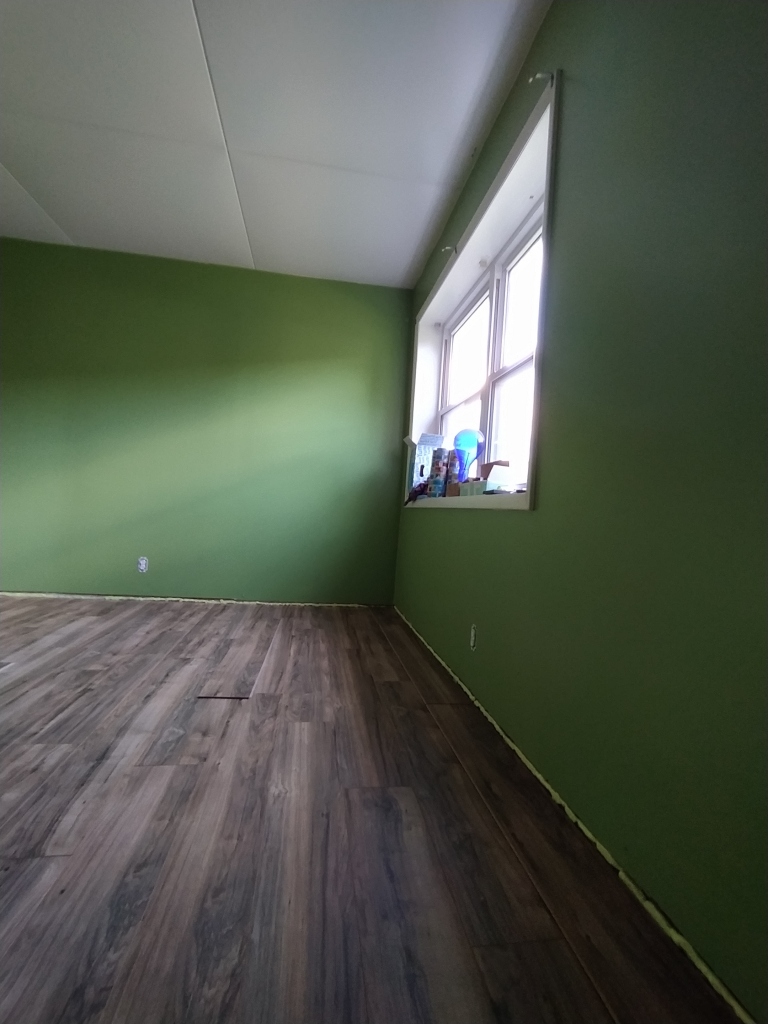
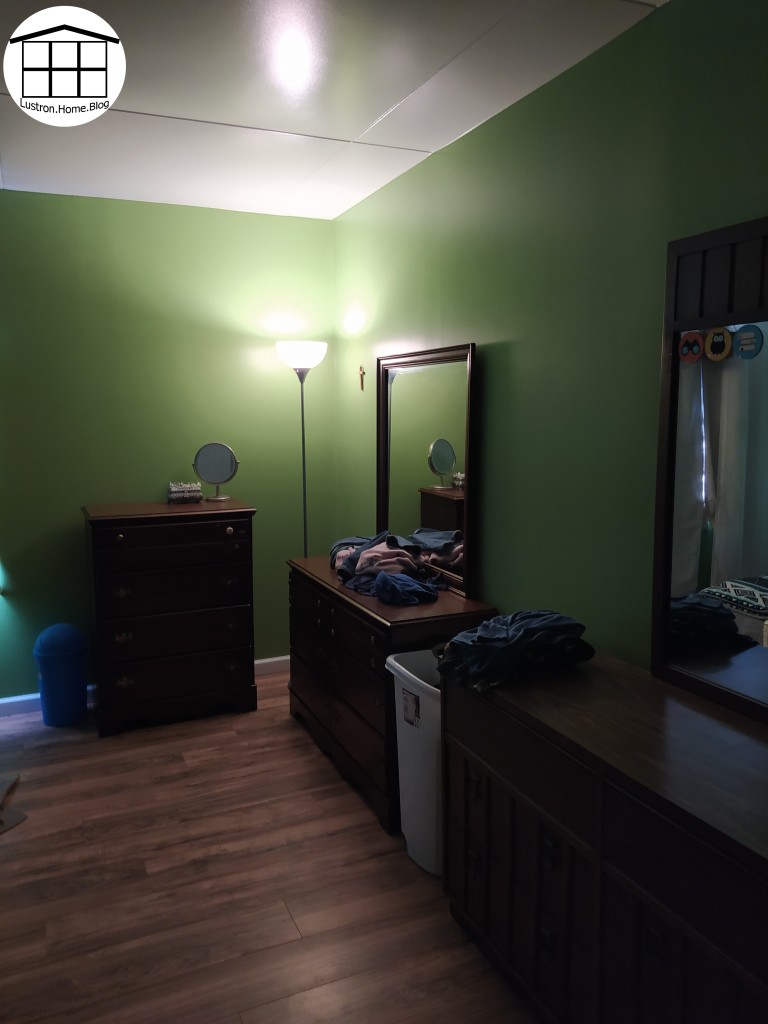
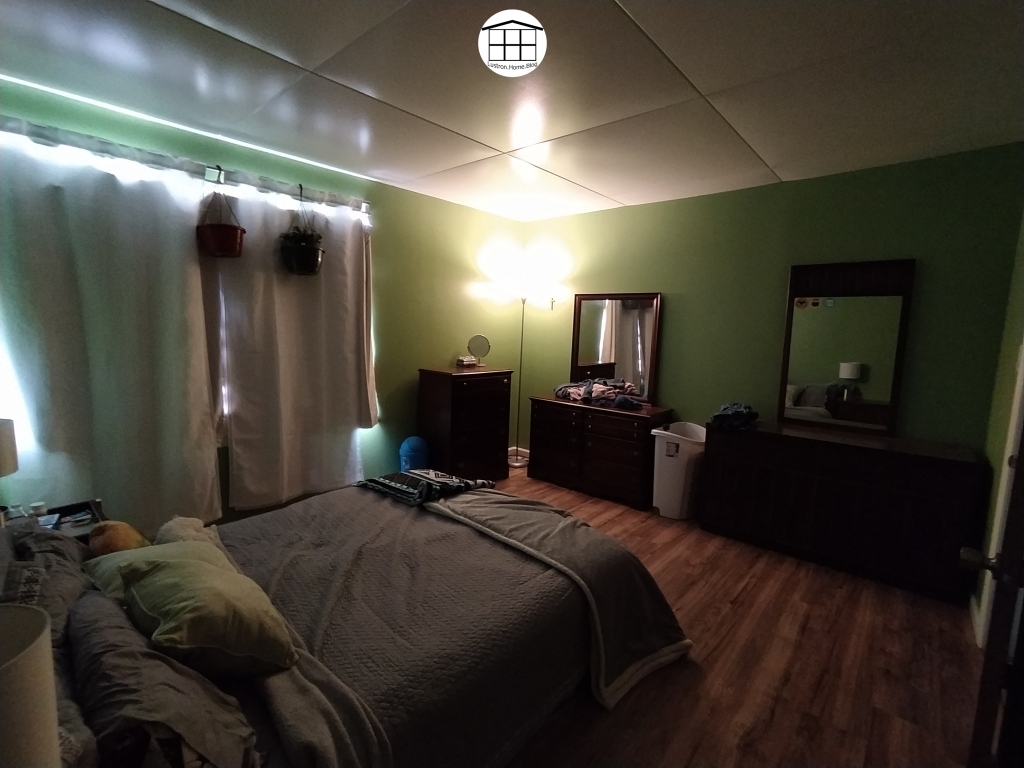
Up until now, I have only posted our guest room being done, however, we had also started our master room, and now it is finished. The process we went through was the same as our guest room, so if you would like to visit that, you can by clicking here.
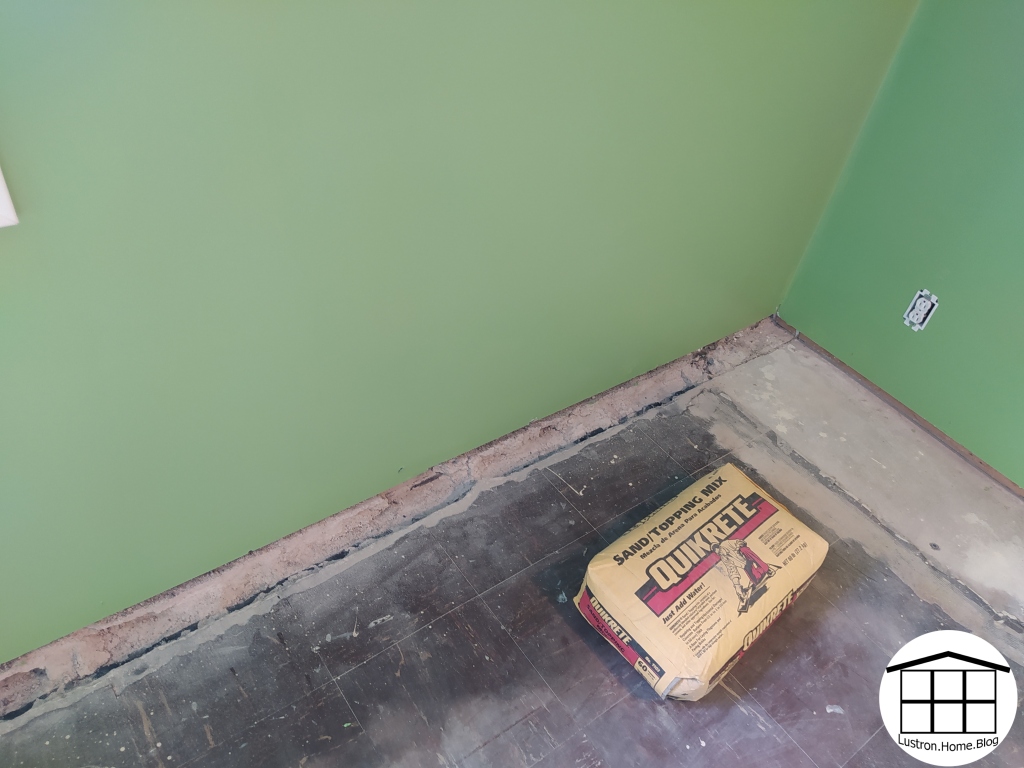
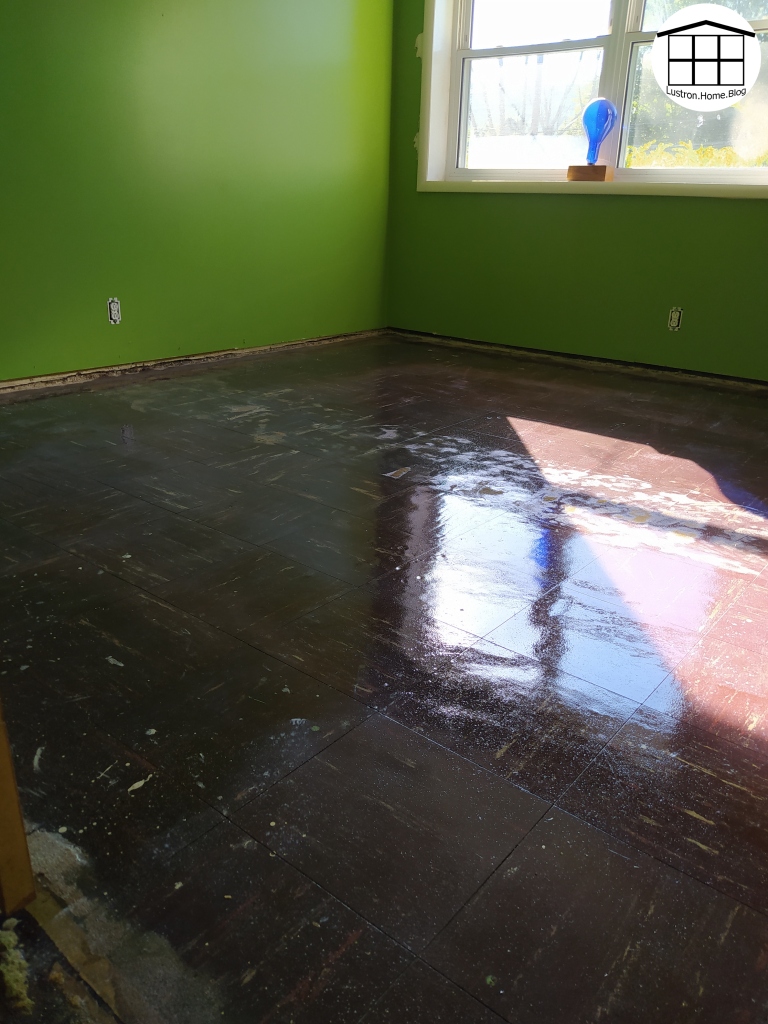
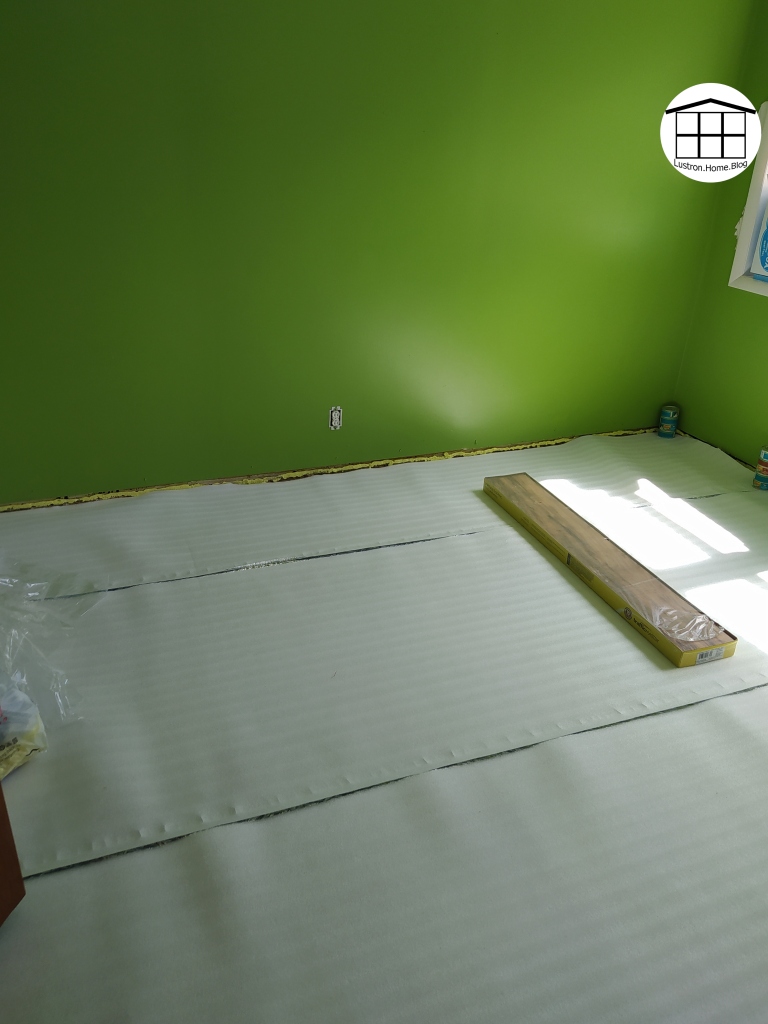
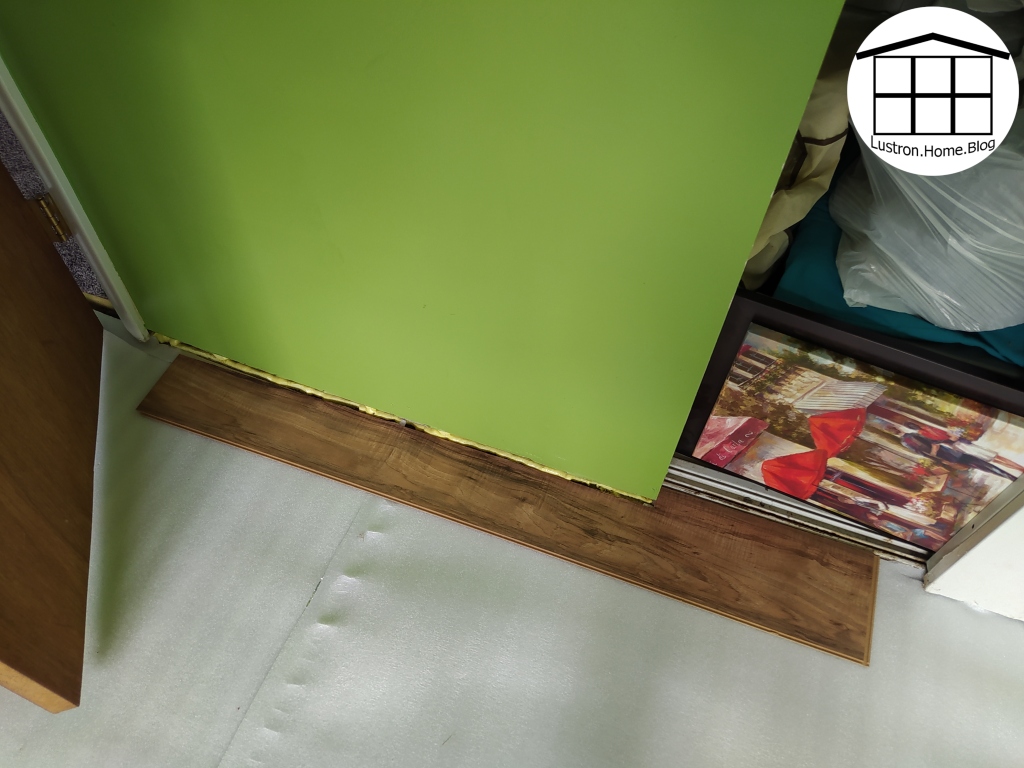
Differences with our master was, I painted the walls before I painted the floor, and the floor was in much worse condition than the guest room. There was quite a bit of mold/mildew on the bottom of the underlayment. The underlayment was also much different from the guest room with a plastic coated foam instead of the exposed porous foam that was in the guest room. Many floor tiles were also loose, but they all sealed back down with the coating of sealant paint. The only other hiccups that occurred doing this room where the fact that the walls were never primed, so in one spot when we were removing the painter’s tape, the old paint pulled off the wall in two small spots, and since the first row of flooring wasn’t perfectly straight and we were tapping boards a lot more than last time, we were having trouble getting the boards to lock together fully about 3/4 of the way through.
Removing Old Carpet
Painting Walls, Chipped Out Cement Edge, and Filling with New Flat Cement
We started this project near the end of June, and by early July we had everything done but painting the trim. Though I like to make a post whenever we do a project, I am learning to wait until the entire project is done instead of posting when everything is “mostly” done. So, the end of August, we got some exterior paint and were able to finish this project. We’ve been working on other projects almost constantly, so it was something we had to get back around to.
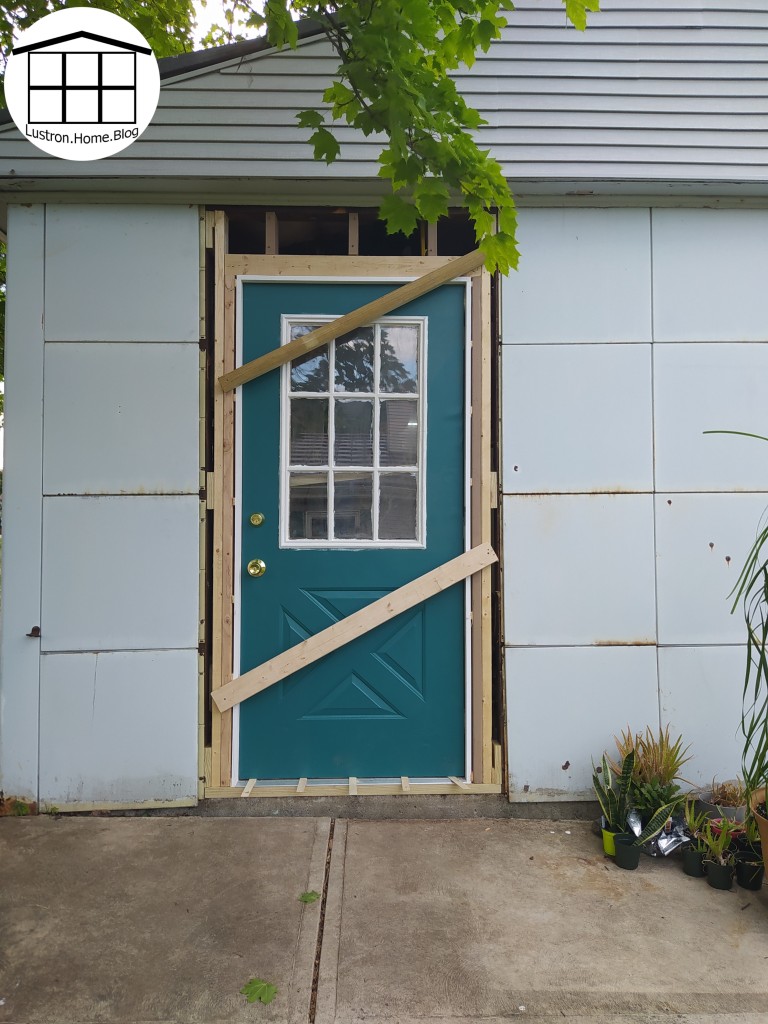
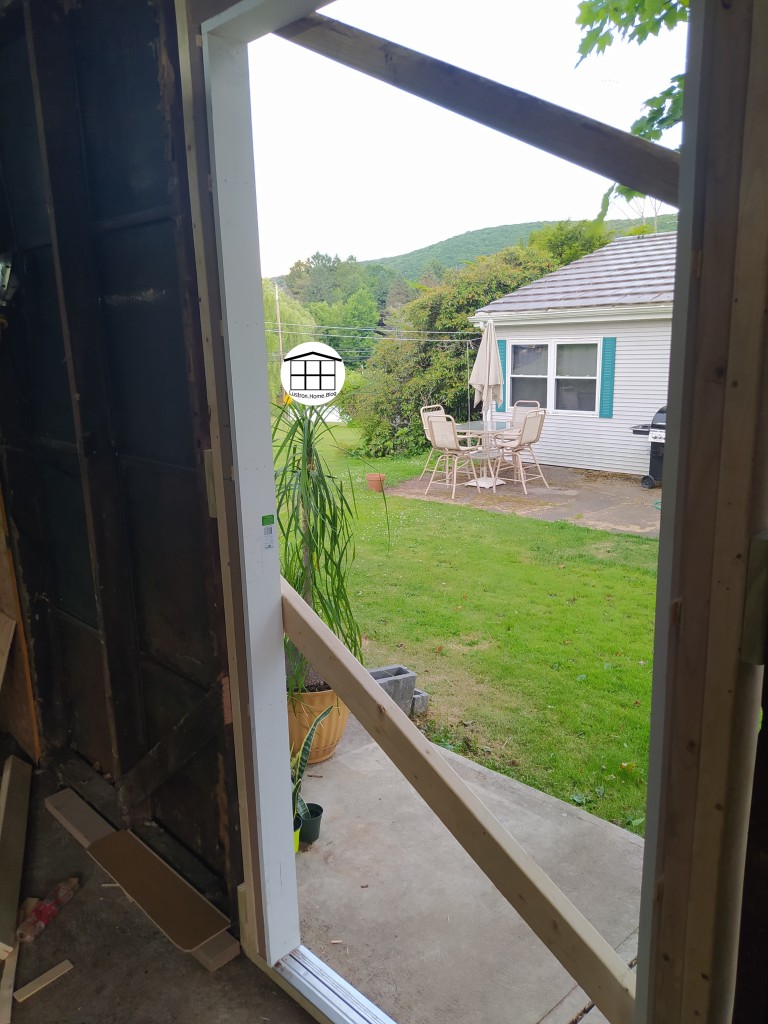
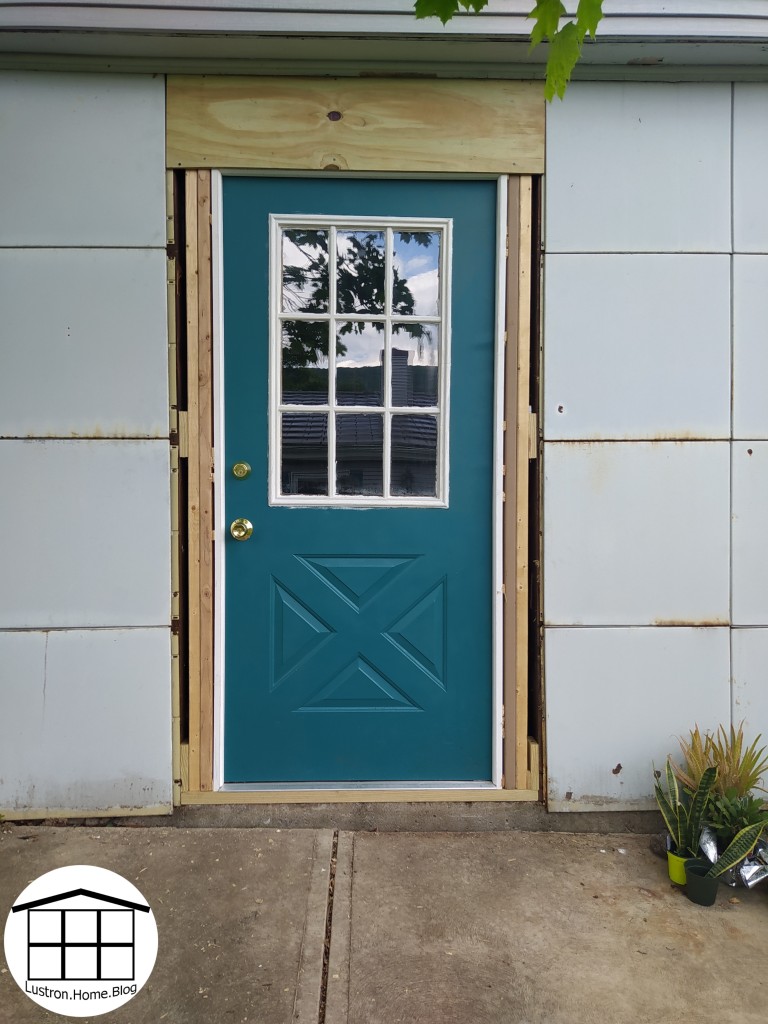
Lustron garages are similar to the house, but there are some construction differences. For example, the house is entirely steel construction, whereas the garage is all wood construction. This made it much easier for us to add the door. The panels are the same between the house and the garage. The panels are attached in only three corners, and what keeps it together is the panels being nested. from the front, the panels are bolted on the left corners and the right top corner. When the wall was assembled, it was assembled from the left bottom corner to the right top corner. The metal shingles are also the same as the house, however the roof design is different. Lustron garages were a secondary thought to this company, and most of the time were just assembled by some contractor the way they would build any other structure. For that reason, you will find must more variation between garages than houses. With that out of the way, you can look through how we added our door. We bought a previously owned steel door for $15 that came with hinges, but was not hung. We would have liked a door that was already hung, however we didn’t want to spend a fortune on a door either, so we went with what we could find, I painted it, and we attached to a door frame that we made ourselves.
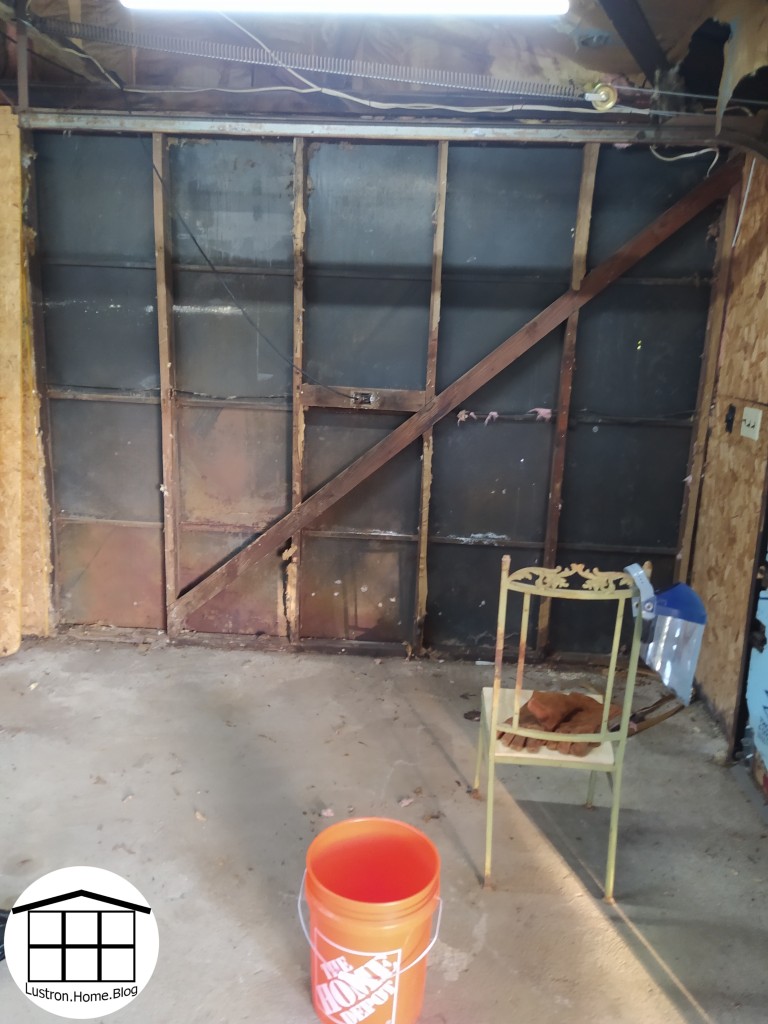
The first thing we did was figure out where-ish we wanted our opening. We had originally planned to more the door so there were two existing panels between the door and the corner. We knew we’d have to move our electrical if we did that, but there would be enough room for the upright freezer and some storage shelves. When we pulled down the wall and could see the footer, there was already an original foundation anchor in it, and though we may have been able to remove it, we didn’t want to mess with the original structural integrity. Before you pull down your wall, you will need to find your studs, but once you do, you can tear out anything in the wall, in our case it was insulation, and clean your work space.
We decided to move the door a segment to the left, and Josh began cutting. As I mentioned earlier, since the panels were assembled a special way, we had to disassemble a special way. Using a sawzall, Josh was able to fit the blade between the panels and studs to cut the bolts. Once all a panel’s bolts were cut, it could just slide right out. We did end up damaging a few panels this way, but many of these panels were severely rusted and some even rusted through. Once that was done, we cut out the existing stud and cross support, and cut the existing footer in the door way to make room for a new threshold.
Once the opening was done, it was all framing and adding the door. First, we added our threshold, and added on anchor into the cement. Then we rough framed the door. We gave ourselves an extra 3 inches for the door and roughed in the opening. We made spacer blocks then added our 2x4s up to the header. There we added shorter 2x4s that were slightly higher than the door, and nailed them to the existing 2x4s. This whole time before we nailed anything, we were adjusting the boards to be as close to level and as close to square as we could get. We added a top plate to the shorted boards and attached it. We added some smaller pieces to attach that to the actual header, then we called it a day because our we found out our well switch had broken (thankfully we keep a spare). We added plywood for the night and got back to it a few days later. We then cut the door frame, cutting the sides before the top, shimmed it in place then nailed it. We added our final threshold and then we took a few more days off before returning. When we came back, we hung the door. First, holding the door where it would be if it were open, we marked the hinge locations. We had enough room that we didn’t have to set in the hinges, but you may have to do that if your space is too tight. Josh pre-drilled the holes, and I held the door as he attached each hinge.
Josh then cut our top trim piece and mounted it, then he cut and mounted each side piece. We added new hardware to the door, and spray foamed around the framing of the door. We left it like that until I was able to paint the trim to finish the project.
It all started with my Starting Point post. There I wrote my initial thoughts and ideas for this house as recorded last November. We bought this house and found many things wrong with it. We starting putting work into the house starting last October/November, and below is what we were able to accomplish so far.
Current Progress
As you can see just between the first set of photos and the second, we’ve made some big changes. We removes trees and bushes, put in raised beds, added an exterior door on the garage, and changed the accent color on the house from red to teal. Inside, we removed a lot of the latex paint off the utility room walls, we built and removed our builtin pantry, and installed a storage shelf instead. We removed the broken dishwasher and sealed the space to be used for my canning stuff. We also upgraded the light in the kitchen, painted cabinets, remove the old range microwave and added a new range-hood, as well as replaced the old leaking kitchen faucet. In the dining room, we refinished the wall after removing about 1/3 of the wallpaper in the house, and we also created a lampshade for our single handing bulb from a lantern we used at our wedding reception. We haven’t done too much to the living room yet; we added a projector screen and are mainly using it for storing some of our extra stuff until we finish the master bedroom. We replaced the light fixture in the hall, and upgraded all the light switches in the house to the rocker style. We repainted the bathroom, removed the medicine cabinet, changed the light fixture, and painted the vanity and changed the hardware. We also added a new shower curtain to match. In the original green room, due to it’s carpet color, we originally replaced the floor in the closet with vinyl planking. After seeing how easy it was, we took on the task of redoing the entire rooms floor, which was not an easy task. we remove the wood from the closet to be replaced with matching floor eventually, I also painted the bedroom the two shades of orange, we moved in, and that is the state of our orange room. Finally, our current project is the master bedroom, or our new green room. We just finished laying the flooring on Saturday. There is still a lot of work we want to do in that room before the new unveiling, but I hope this helps build some excitement for the next unveiling, which will be coming in the next two weeks or so.
A Year’s Worth of Projects
A year is so long, yet so short. We were able to accomplish so much because of the blessing we’ve received this year and from taking things in stride. We are happy for our new experiences and are content with this house even as we continue to find more problems. We aren’t sure if we’ll keep this house forever, but we are happy for all the good things this house is providing for us. This Lustron gives my husband and I something to do together, to bond over, and to dream for. We hope for nothing but the best for this house in the future, and we hope our fingerprint on this house improves the beauty of this old Lustron, rather than hinders it’s potential.
For more on our home improvement posts from this year, feel free to check out any of this posts below. If not, I’ll see you again soon!