Hello again. This is my first year making swags by myself, but for several years my family has been making them just for ourselves for Christmas. This can be a great option for a gift, or for a DIY home decoration. It is helpful if you have some evergreens on your property, but if that’s not the case, most neighbors won’t mind your trimming their bushes, assuming you ask first. Our property has several yew bushes, so that is the evergreen I used for my base. I also have a monstrous holly in the front yard that is easily 15 feet tall, so I trimmed it quite severely. Beyond that, you could get some holiday decorations from a craft store to stick into your swags, but that is your choice. I have a few bows from previous years, and some ribbon to make more as I want. I also added a third step to show you can also make grave blankets using this technique, and what I did with my excess cut holly. Please comment if you have any questions, and I hope you have a Merry Christmas!
Advertisements
Directions
1. Cut a variety of different branches. Cut different colored branches, different sizes, and your favorite types of branches. Once you have your variety, lay down a large tarps to collect debris. Begin separating your branches into piles starting with the biggest branches on the bottom and stacking smaller on top. Once you have a stack, add an accent branch on top.
2. Once your satisfied with the way your stack looks, use some floral wire, beading wire, or quality twine to tie together the end. Try to weave around some of the branches to keep them from falling out, and wrap around several times. Tie it off once done. Finally, add another piece of wire, but leave some space during one of your wraps, so you can use that loop to hang your swag. Add any bows or decorations you desire, trim any unsightly branches, and hang.
3. If you’d like, you can also make a grave blanket using this same pattern, just alternating directions. You can see I made one. I also had lots of holly left over, so I used it to decorate my mantle for the season.
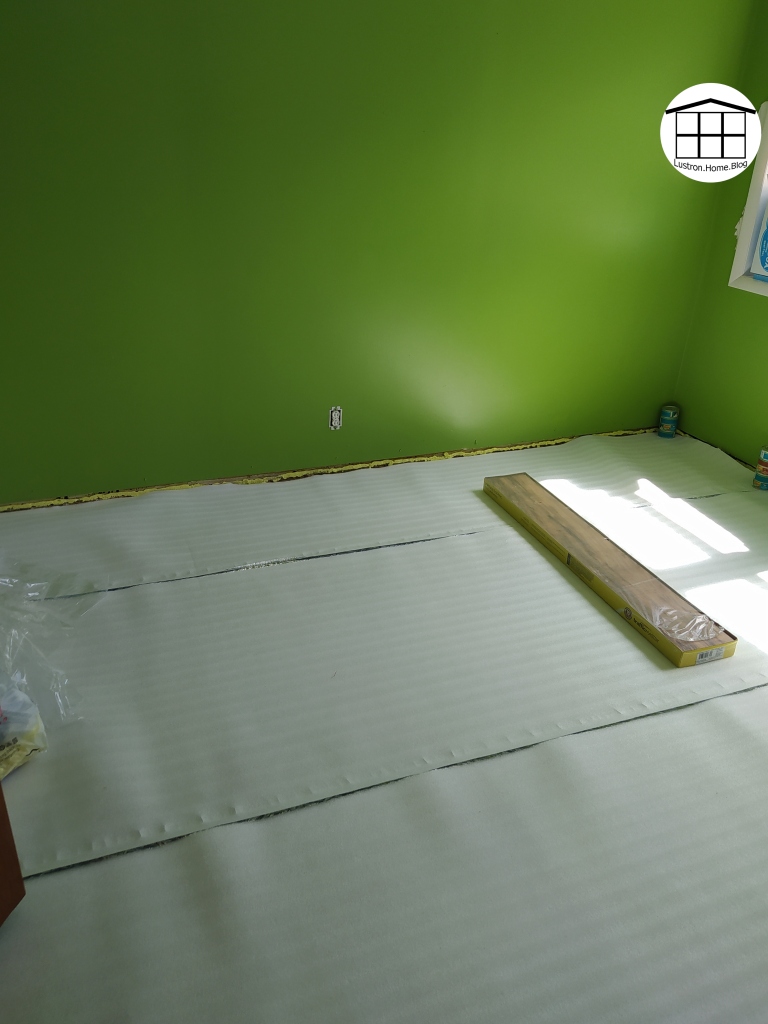
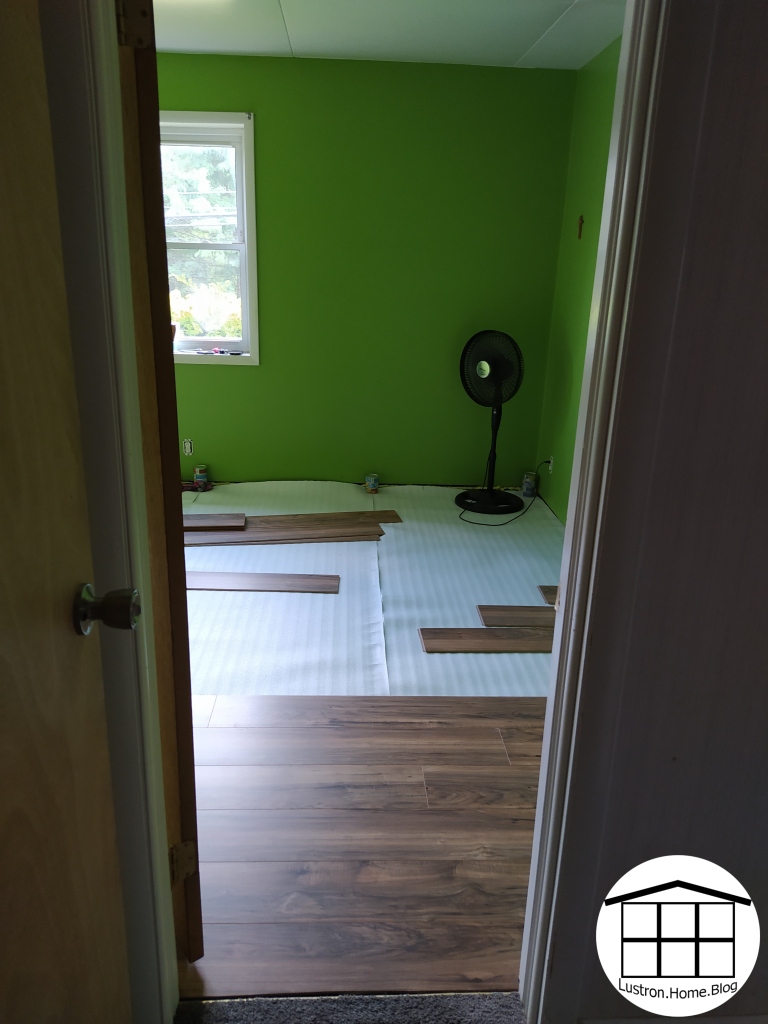
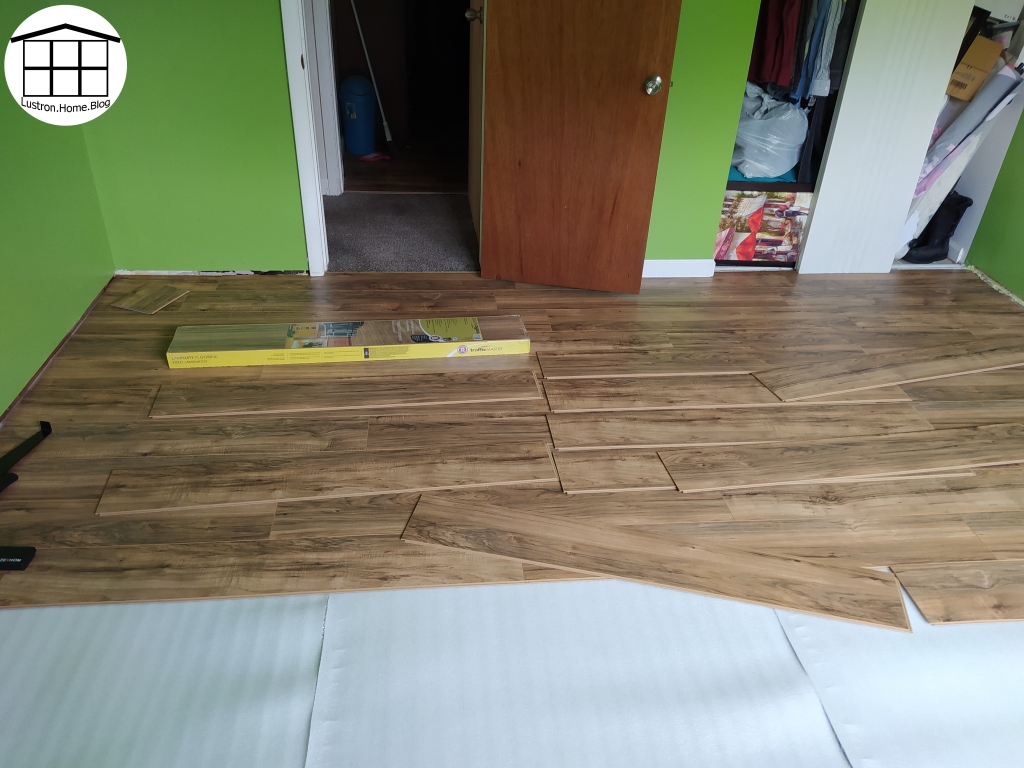
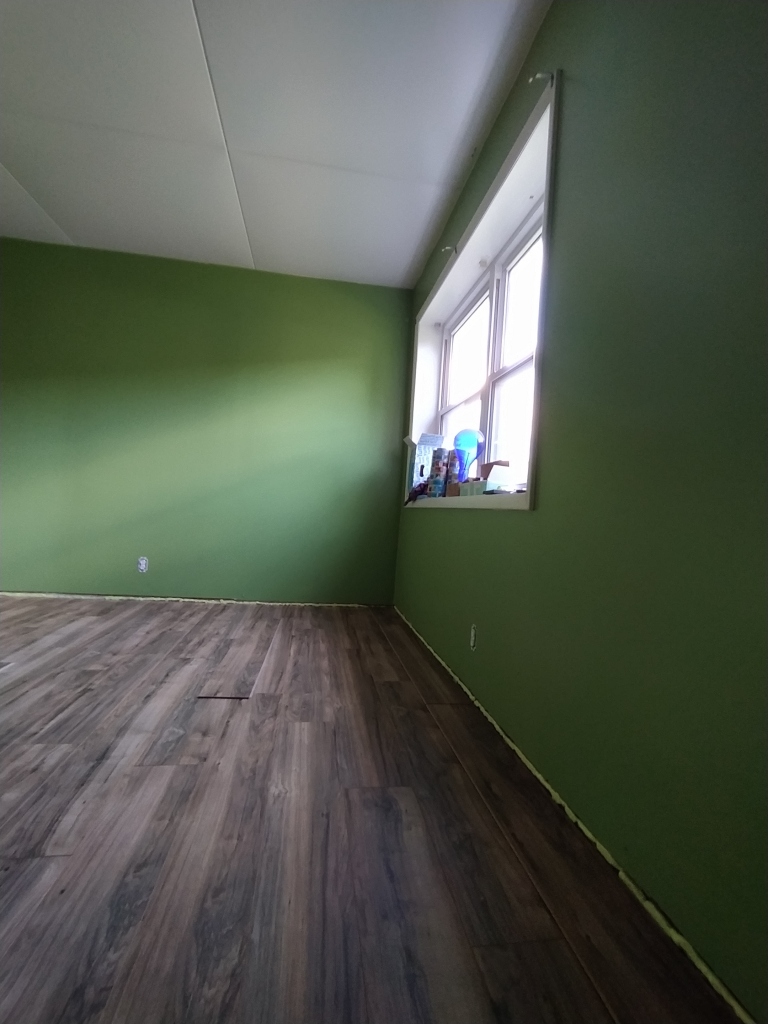
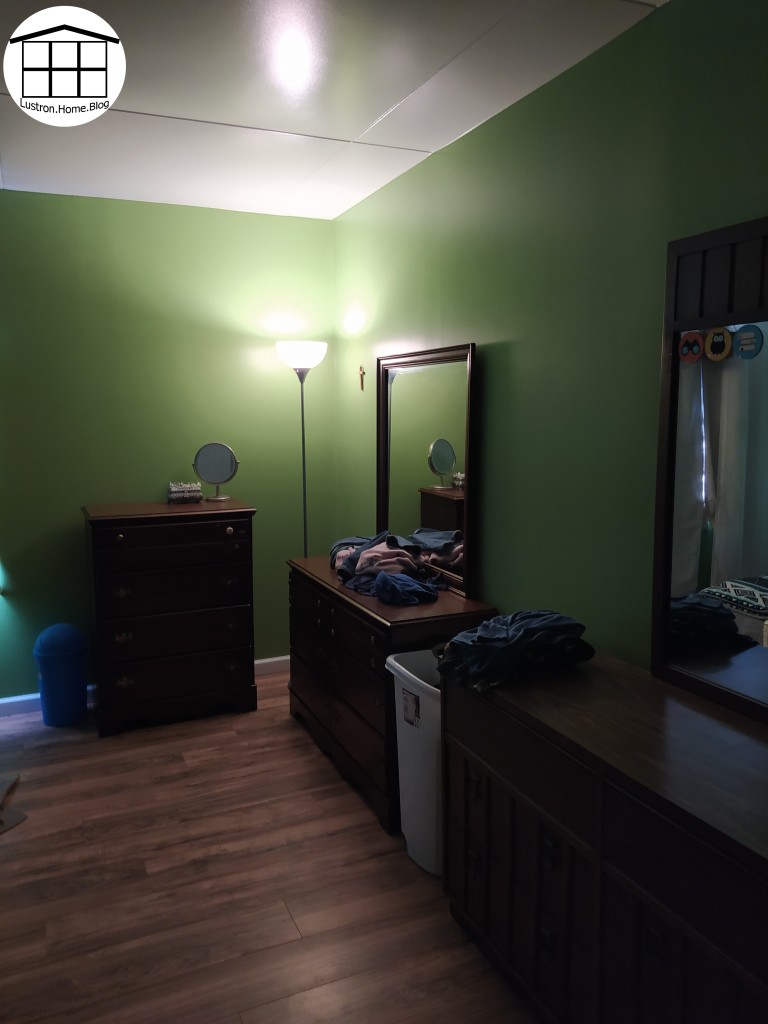
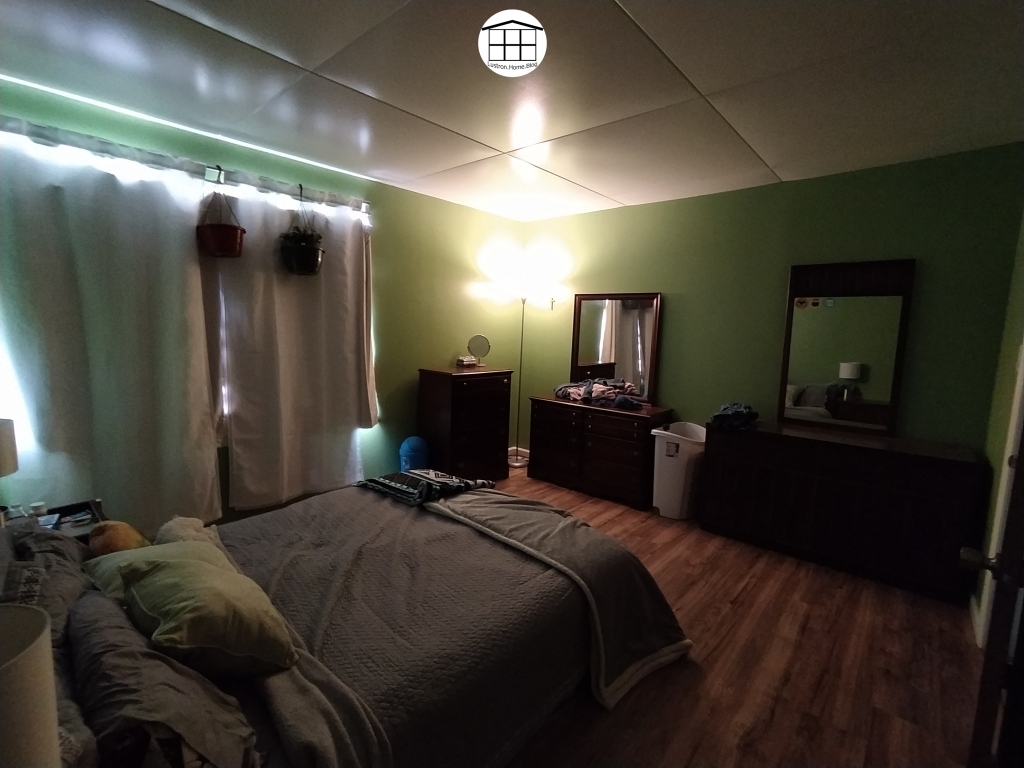
If you’ve been following for a while, you may remember that at the beginning of quarantine, my husband and I bought flooring. We bought enough flooring for the entire house, and if you want to read more about that, you can find it here.
Up until now, I have only posted our guest room being done, however, we had also started our master room, and now it is finished. The process we went through was the same as our guest room, so if you would like to visit that, you can by clicking here.
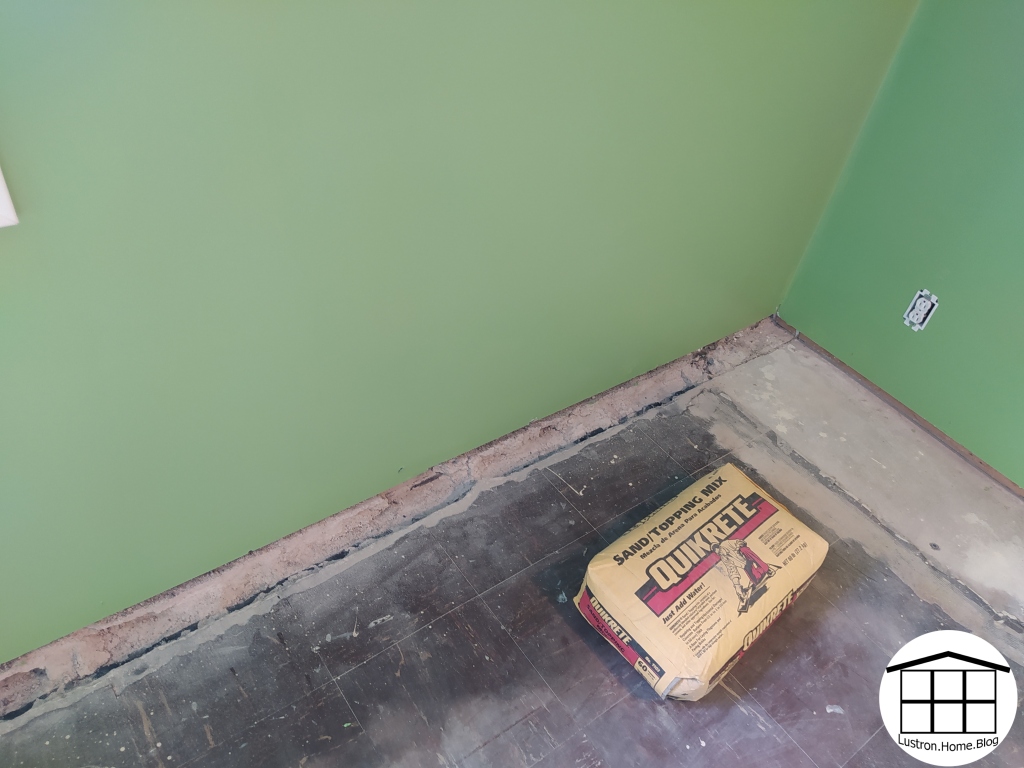
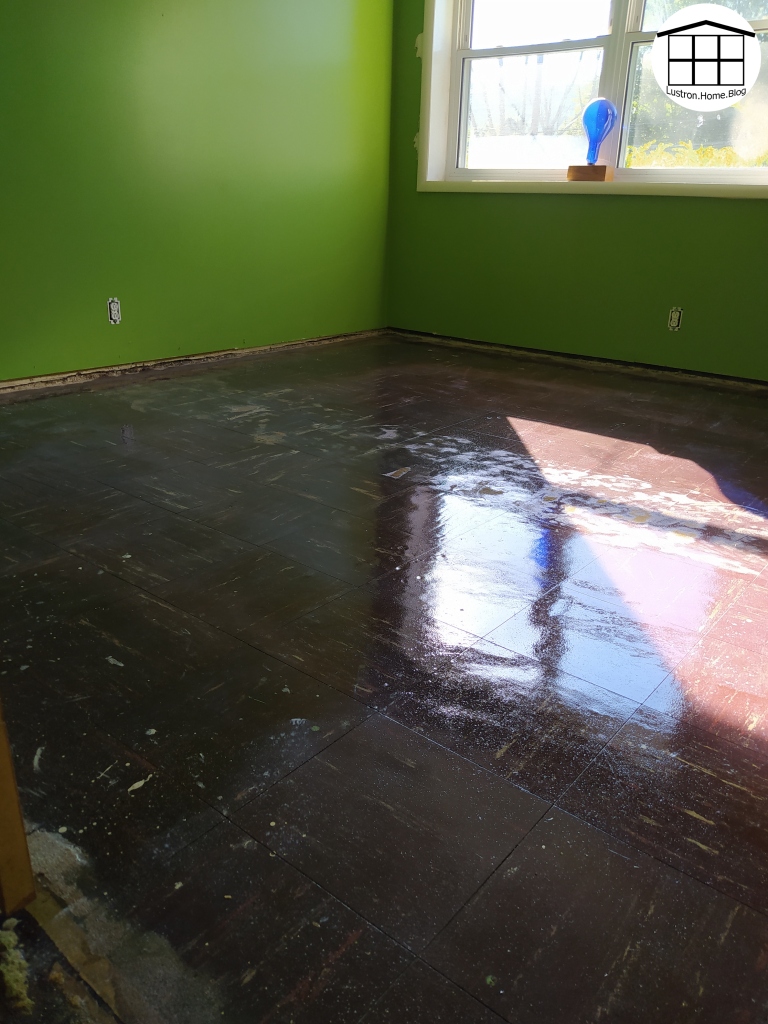
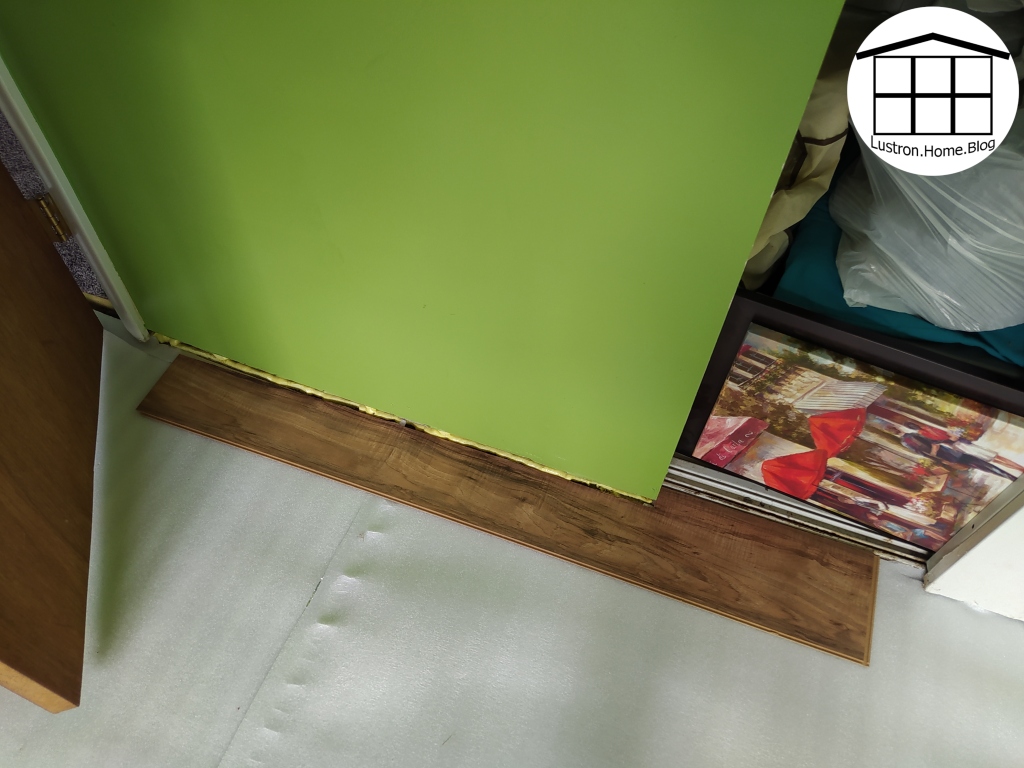
Differences with our master was, I painted the walls before I painted the floor, and the floor was in much worse condition than the guest room. There was quite a bit of mold/mildew on the bottom of the underlayment. The underlayment was also much different from the guest room with a plastic coated foam instead of the exposed porous foam that was in the guest room. Many floor tiles were also loose, but they all sealed back down with the coating of sealant paint. The only other hiccups that occurred doing this room where the fact that the walls were never primed, so in one spot when we were removing the painter’s tape, the old paint pulled off the wall in two small spots, and since the first row of flooring wasn’t perfectly straight and we were tapping boards a lot more than last time, we were having trouble getting the boards to lock together fully about 3/4 of the way through.
Removing Old Carpet
Painting Walls, Chipped Out Cement Edge, and Filling with New Flat Cement
We started this project near the end of June, and by early July we had everything done but painting the trim. Though I like to make a post whenever we do a project, I am learning to wait until the entire project is done instead of posting when everything is “mostly” done. So, the end of August, we got some exterior paint and were able to finish this project. We’ve been working on other projects almost constantly, so it was something we had to get back around to.
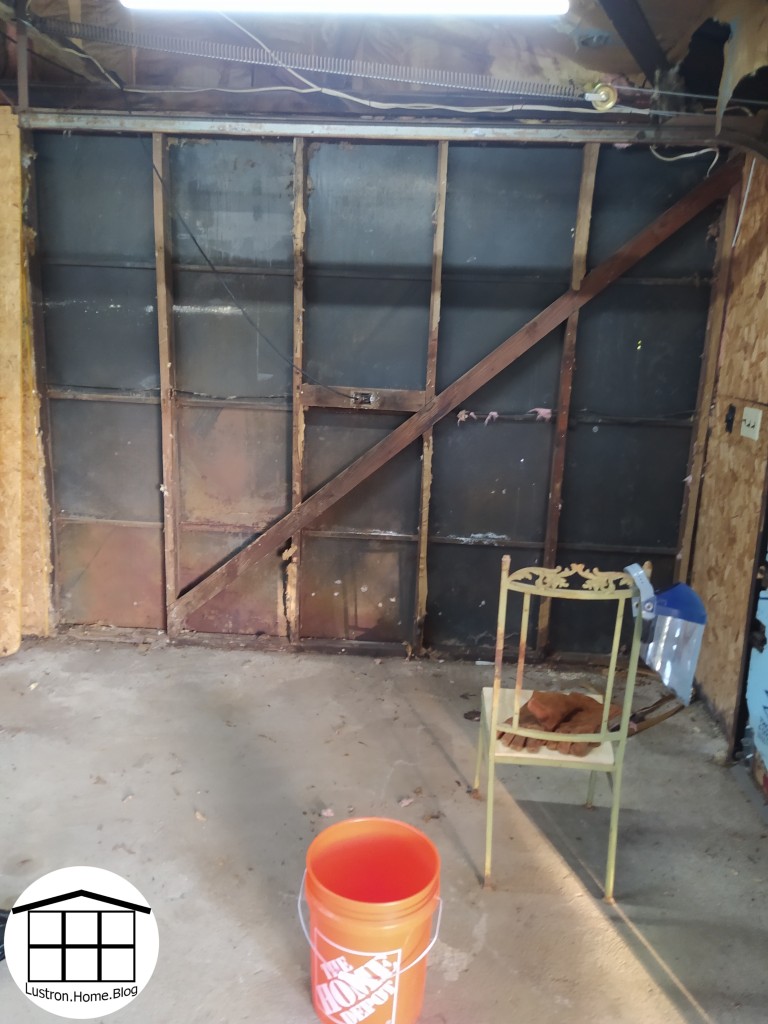
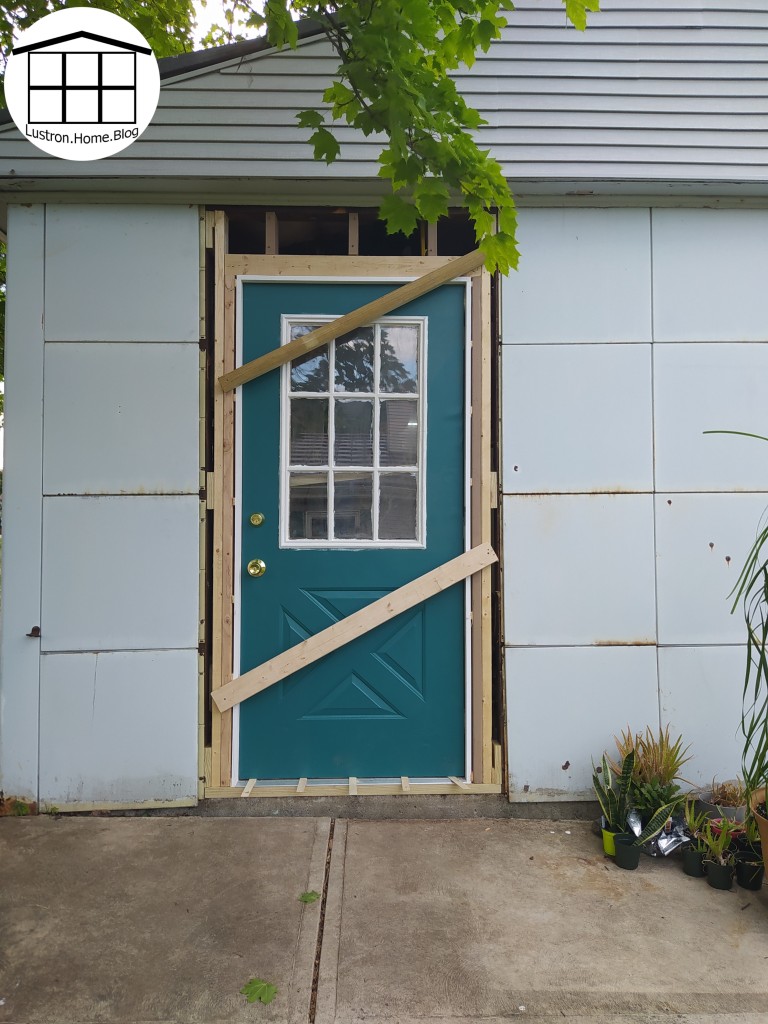
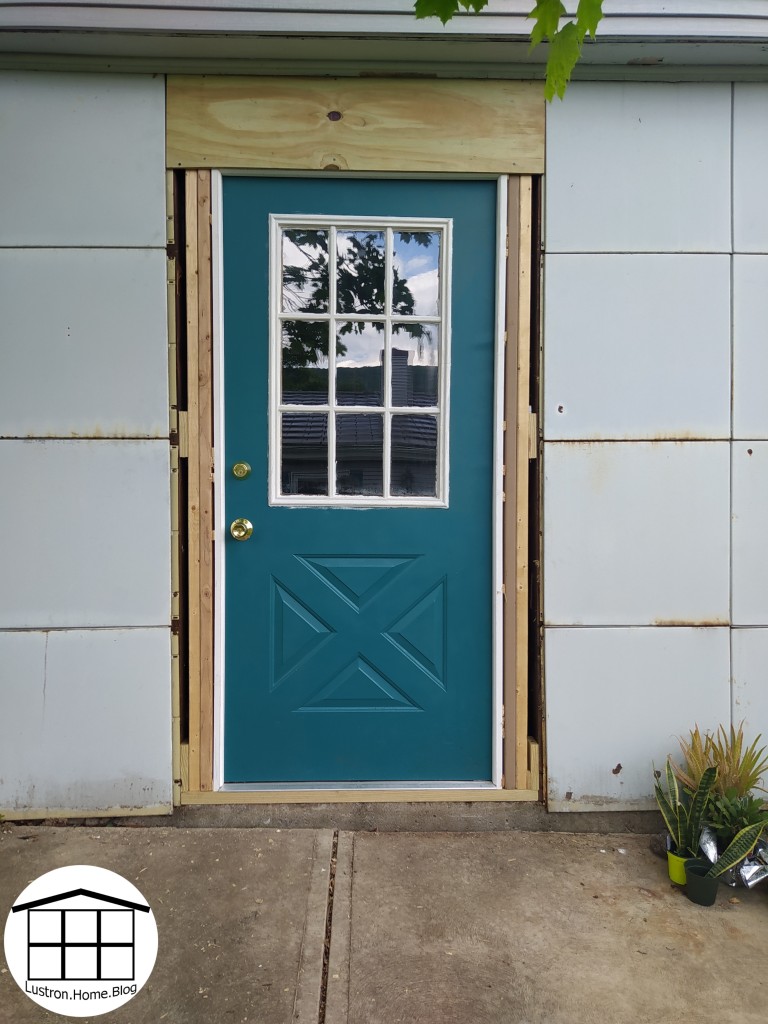
Lustron garages are similar to the house, but there are some construction differences. For example, the house is entirely steel construction, whereas the garage is all wood construction. This made it much easier for us to add the door. The panels are the same between the house and the garage. The panels are attached in only three corners, and what keeps it together is the panels being nested. from the front, the panels are bolted on the left corners and the right top corner. When the wall was assembled, it was assembled from the left bottom corner to the right top corner. The metal shingles are also the same as the house, however the roof design is different. Lustron garages were a secondary thought to this company, and most of the time were just assembled by some contractor the way they would build any other structure. For that reason, you will find must more variation between garages than houses. With that out of the way, you can look through how we added our door. We bought a previously owned steel door for $15 that came with hinges, but was not hung. We would have liked a door that was already hung, however we didn’t want to spend a fortune on a door either, so we went with what we could find, I painted it, and we attached to a door frame that we made ourselves.
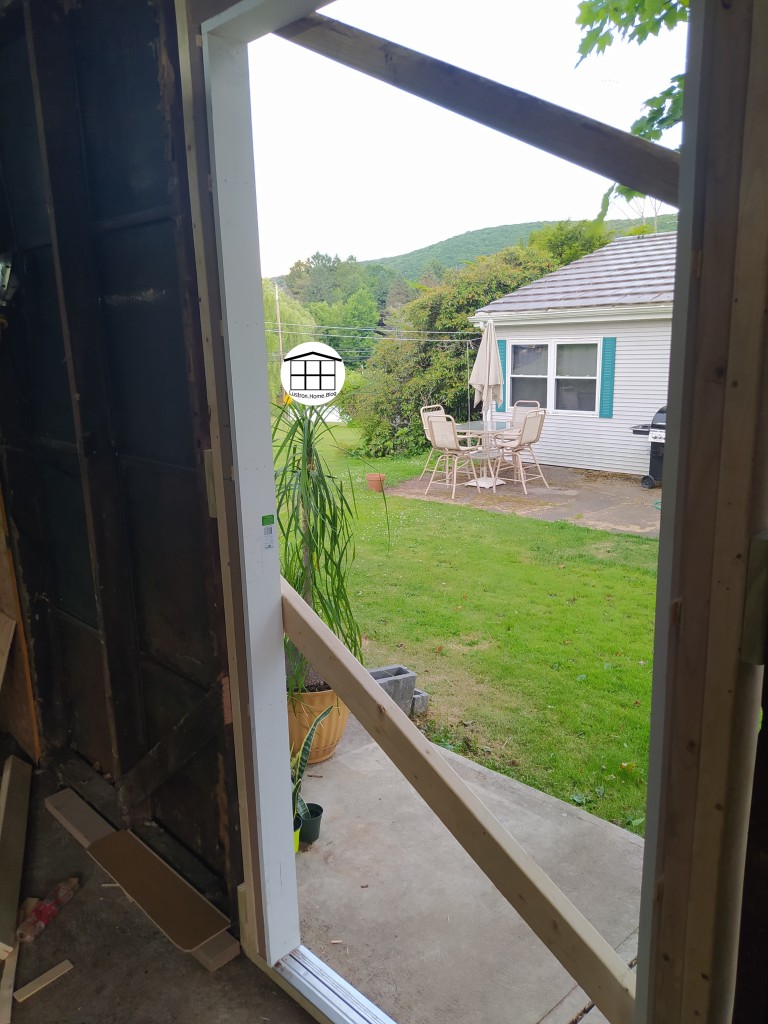
The first thing we did was figure out where-ish we wanted our opening. We had originally planned to more the door so there were two existing panels between the door and the corner. We knew we’d have to move our electrical if we did that, but there would be enough room for the upright freezer and some storage shelves. When we pulled down the wall and could see the footer, there was already an original foundation anchor in it, and though we may have been able to remove it, we didn’t want to mess with the original structural integrity. Before you pull down your wall, you will need to find your studs, but once you do, you can tear out anything in the wall, in our case it was insulation, and clean your work space.
We decided to move the door a segment to the left, and Josh began cutting. As I mentioned earlier, since the panels were assembled a special way, we had to disassemble a special way. Using a sawzall, Josh was able to fit the blade between the panels and studs to cut the bolts. Once all a panel’s bolts were cut, it could just slide right out. We did end up damaging a few panels this way, but many of these panels were severely rusted and some even rusted through. Once that was done, we cut out the existing stud and cross support, and cut the existing footer in the door way to make room for a new threshold.
Once the opening was done, it was all framing and adding the door. First, we added our threshold, and added on anchor into the cement. Then we rough framed the door. We gave ourselves an extra 3 inches for the door and roughed in the opening. We made spacer blocks then added our 2x4s up to the header. There we added shorter 2x4s that were slightly higher than the door, and nailed them to the existing 2x4s. This whole time before we nailed anything, we were adjusting the boards to be as close to level and as close to square as we could get. We added a top plate to the shorted boards and attached it. We added some smaller pieces to attach that to the actual header, then we called it a day because our we found out our well switch had broken (thankfully we keep a spare). We added plywood for the night and got back to it a few days later. We then cut the door frame, cutting the sides before the top, shimmed it in place then nailed it. We added our final threshold and then we took a few more days off before returning. When we came back, we hung the door. First, holding the door where it would be if it were open, we marked the hinge locations. We had enough room that we didn’t have to set in the hinges, but you may have to do that if your space is too tight. Josh pre-drilled the holes, and I held the door as he attached each hinge.
Josh then cut our top trim piece and mounted it, then he cut and mounted each side piece. We added new hardware to the door, and spray foamed around the framing of the door. We left it like that until I was able to paint the trim to finish the project.
August was an eventful month in the garden. In the beginning of the month, I pulled a tomato plant because of fungus. On the 27th, I pulled my cucumbers from the fabric pots. They began forming very misshapen fruits, and the leaves were dying off rather fast. I also planted radish seeds that day in the two open fabric pots and in the free rows of the raised beds. They already have decent sized sprouts, and the rainy weather helps too. I noticed several of my tomatoes had blossom end rot, but I added some crushed egg shells and with lots of rain in the forecast, it had only happened to 3 tomatoes. Finally, I also ordered garlic to be planted beginning to mid-October. I tried to grow garlic last winter, but I really had no idea what I was doing, so they didn’t make it through the freeze. Finally, I’ve also begun trying to root a pineapple top. And, I found a volunteer pumpkin vine by the house.
I’ve also been thinking extensively about the garden for next Spring, Summer, and Fall. Josh and I plan to build 2 more 8X3 or 4 beds. We plan on placing them by our baby peach tree and we plan to place lower maintenance plants there, though I check on my garden at least once a day. Beans grew really well for us this year, so we plan to grow more green beans. We bought heirloom garlic from MI Gardener, so we plan to grow 3 varieties. We didn’t have much luck at all with tomatoes this summer, so though I’ll be more careful next year to water more often and soak them, I plan to up our quantity to 10 tomato plants with 2 heirloom varieties. I’d like to grow bell and banana peppers next year, potatoes and sweet potatoes, cabbage, broccoli, and more onions, but this time from seed. And, once garlic in harvested in July, we’ll wait about a month or so, and plant some peas. We are ambitious, but this summer has been such a blessing to us that we’d love to have even more fresh veggies next year! We would plant zucchini, yellow squash, or eggplant, but my in-laws always grow lots, so we help absorb some of their excess. Finally, we contemplated more carrots, growing celery, and beets, but we’d like to grow the garden in increments that won’t overwhelm me, and hopefully doubling in size won’t be too much.
This summer we also got quite a bit of seed from our garden. The radish seed pods below is about 1/2 the quantity I got from about 4-5 plants I let go to seed. It took me about 3 hours to break and filter out the seed, and I easily have 100-200 seeds. I also got 3 onion flowers from my sets this year. They formed seeds, but I want at least one other variety, so I will also be buying a packet of seeds. Finally, as I mentioned, my green beans have been doing great. We were harvesting once a week, but just Monday when I was harvesting, I found about 3 pods that were drying. So, I also got 12 new seeds from that, and I will now be harvesting beans twice a week until they slow down. I also am letting my lettuce go to seed, though we’ll see how far they get before I turn my beds.
This weekend, Josh and I were looking at an end of season camping trip. As the weather was getting colder, we decided it was now or never for finally going on a summer trip. We chose not to, but I did lots of research, and below that I will have a list of refrigeration free meals and snacks. This is not only a good resource for future camping trips, but it’s a good idea to have some of these items in storage for the next possible natural disaster.
Meals
Cereal with Evaporated/Powdered Milk
Oatmeal with Evap./Powdered Milk, with dried fruit