This weekend I was able to cook up the last of the pork loin roast I prepared. For our last meal, I sliced off a couple more pork chops and prepared some honey mustard sauce to top. Simply mix together the sauce and coat the chops, bake then serve. We had these over spinach and the glaze made a delicious sauce for the spinach too. This recipe makes 2-3 servings, but can be easily altered as needed.
Heat oven to 350 F. Place the pork on the foil lined sheet. Mix together remaining ingredients in the small bowl. Coat each side of the pork with the sauce.
2. Place the pork in the oven. Bake raw pork for 25-30 minutes or cooked pork for 15-20 minutes, until internal temperature reaches 165 F. Top cooked pork with any remaining sauce, then serve right away.
As I’m still working through my pork loin roast, I’ve been coming up with as many options for the rest of it. I’ve always been a big fan of BBQ pork, so I thought it would be great for a potion of it. For this, I made a standard BBQ pork rub. The paprika adds a nice smokey flavor to the rub. The cumin and cayenne also add a bit of spice, but without much heat. The rub recipe below is good for 2-3 normal sized pork chops. If you were to use this rub on a roast, you will need to double or triple it. I also served this BBQ pork with BBQ sauce, bacon ranch suddenly salad, and a can of baked beans.
Heat oven to 350 F. Place the pork on the foil lined sheet. Mix together remaining ingredients in the small bowl. Coat each side of the pork, and coat edges.
2. Place the pork in the oven. Bake raw pork for 25-30 minutes or cooked pork for 15-20 minutes, until internal temperature reaches 165 F.
Smash burgers are a classic form of burger that doesn’t need any altering. You simply form balls, place them onto a hot skillet or flat top, smash them thin with your spatula, then season with salt and pepper and cook one minute per side. These burgers are always delicious and are super easy to make. You can also make a lot with only a little bit of meat, which is another huge plus! Beyond that, I also made fondant potatoes and squash to go with these burgers. Fondant potatoes usually take a while to make since you cut your potatoes into large patties then cook them covered for almost an hour. This recipe makes it all so much easier, and adds a different flavor and texture with added squash. The savory broth adds amazing flavor to these potatoes and makes fondant potatoes one of my very favorite forms of potatoes. We also served this meal with a side of sliced dill pickles, and they were delicious! This recipe makes 8 burgers, which is 8 adult servings, and 5 servings of the fondant potato and squash side.
1. Place potatoes and squash in one frying pan. Add oil and place over medium heat. Cook for 10 minutes stirring regularly. Begin heating second frying pan over medium heat.
2. Mix together Burger and A1 in a medium bowl. Form into 8 equal sized patties. Add broth to potatoes and squash, and boil until most/all liquid is gone.
3. Begin by adding 2 balls of meat into second pan, and smash into a very thin patty. Add salt and pepper and cook for 1 minute, then flip. Salt and pepper the second side, cook for another minute, then remove patties from heat and place on serving plate. Repeat for remaining burgers.
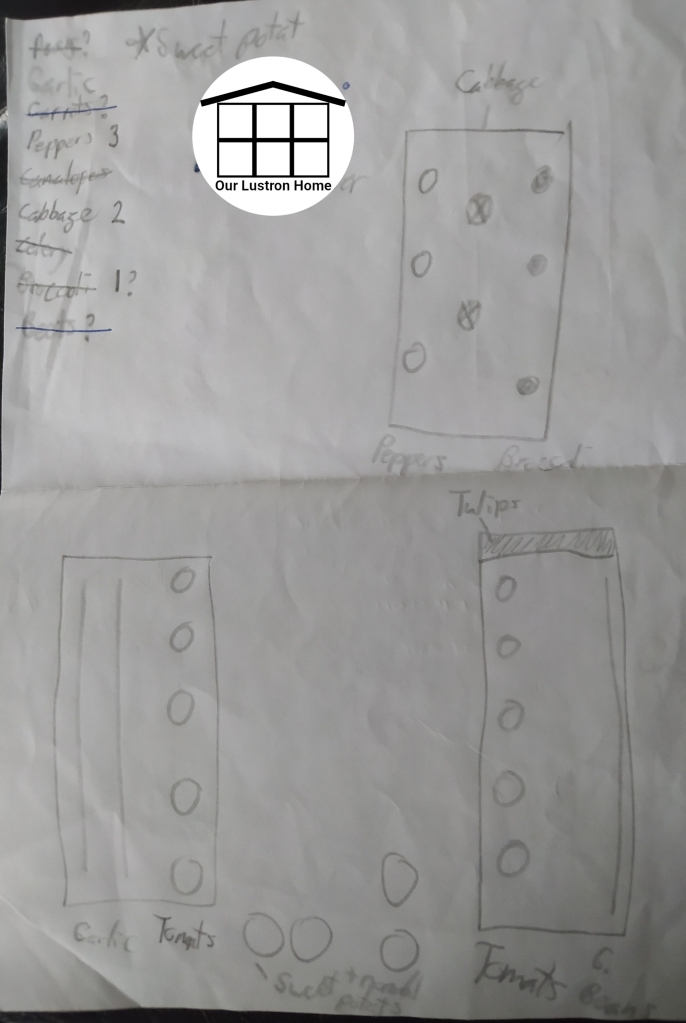
I’ve been planning my 2021 garden since fall and have altered the plans several times. It’s important to keep a record of your plans, and I so far have 5 sketches for my 2021 garden dating back to September. This year will be my second year with a garden, and I’m planning for a 3 season garden. This means I have plans for all seasons, Spring, Summer, and Fall, and plans on what goes well together and what will go in once one stops producing. With this planning also comes many decisions. I have decided to start everything from seeds except what doesn’t use seed. I have also decided to use two new small raised beds and to use two more fabric pots than last year, however since I flipped the beds this fall, I only have one of the five bags I need filled. I’ll also be figuring out how to fill them early this spring. The soil is very compact here and not very fertile. We do have a compost bin, but it is much too small to be a hot pile, so though there is some dirt at the bottom, it will take a very very long time before I’ll get any significant compost from it.
Advertisements
The Plans
As I mentioned these plans have changed and evolved over time. The first things I did when planning my garden were to make a list of all the vegetables we eat a lot of and we feel would be a fun challenge for the next year. I also sketched out a layout for the garden. Then I began to place the plants I really wanted into the sketch accounting for plant spacing. Then, when you get to your last few plants you have to make the decision of what you want to plant this year. Take into account, how much you currently have stored, how often you eat it, and if you will have the means to store certain vegetables over an extended period of time.
Advertisements
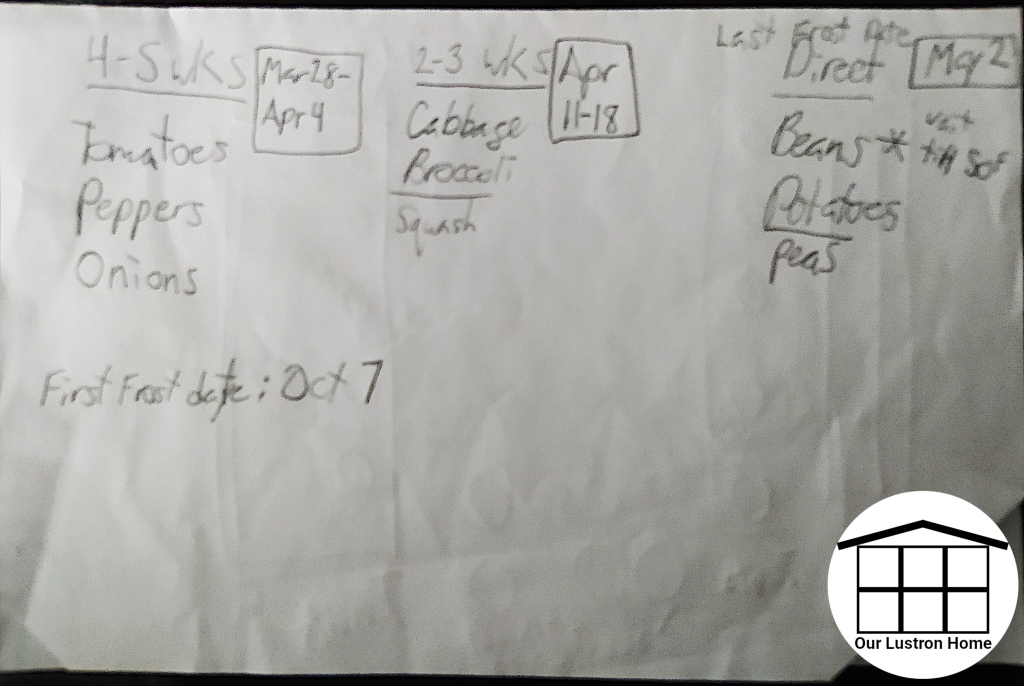
Once your vegetables are picked, you can tweak your plans over the span of a few weeks. However, when you finally are set on what you plan to grow, be sure to order seeds! Seeds are in a higher demand than normal and it could take a while to get seeds or for them to come back in stock. Beyond that, it will just be deciding when you can plant things, and what can be planted once one plant is ready to be pulled. For example, I already have my garlic in the ground and it came up before the hard freeze came, so I know that will be planted until late July when it will be time to harvest. After that, I will plant beets. I denoted that by a “/” on my sketch. I have several other plants I will be doing that with, I plant to plant Peas, once it gets warm, pull the peas and plant green beans, then come August/September, I’ll be able to plant a second planting of peas. I’ll be doing the same thing with my second new bed, but with two plantings of broccoli and one planting of cabbage. I also Plant to plant potatoes once the ground is warm, and once they are harvested, I will be planting Spinach in the fall. I am in zone 6A, so my timeline will likely be different than yours, however I hope you were able to get some helpful information.
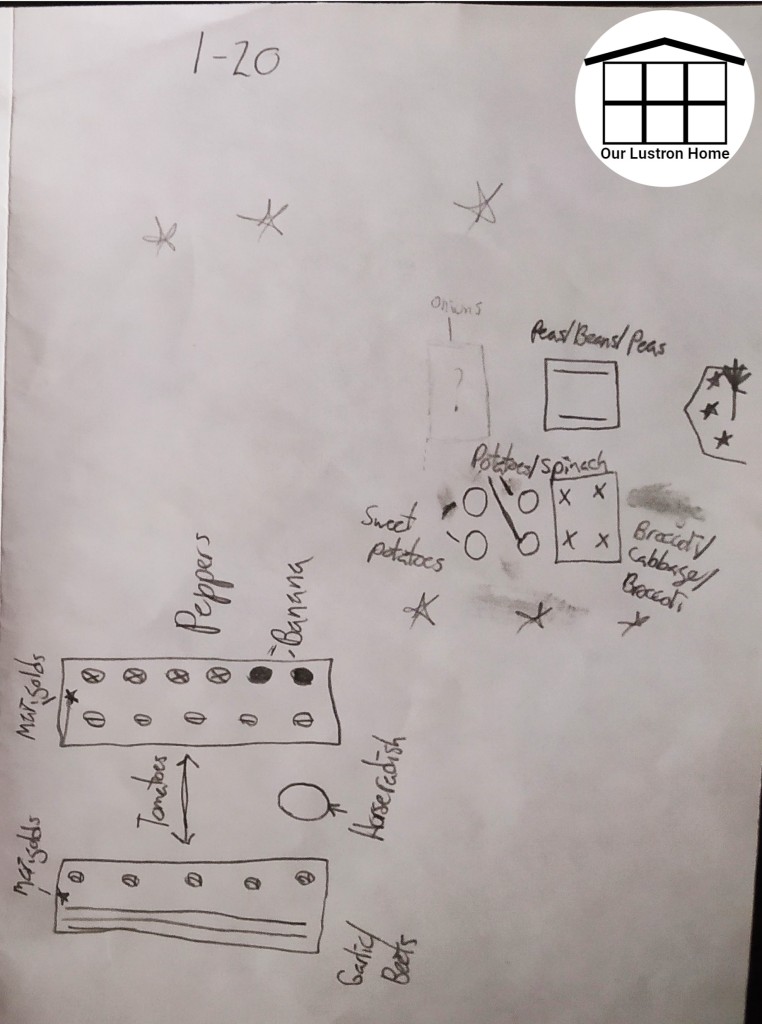
Some possible questions you may have, I’ll try and answer before hand, but feel free to ask any questions you might have down in the comments. I’ll just hop into it. The circles not within a rectangle/square are my fabric pots. I plan to plant one with horseradish, two with sweet potatoes, and two with potatoes and spinach. The rectangles on the left side of the page are 4ft x 8ft beds that are 12 inches deep. These are the beds I started with last year. The square beds on the right of the page will be 4 ft x 4 ft beds, though they have not been constructed yet. There is also a possibility for another 4 ft x 8 ft bed for onions, but that will only happen if the cost of lumber comes down significantly before May. Most people in my area have a consensus not to plant anything in the ground before Memorial Day, however, plants like peas and broccoli are very cold hardy, so their spring planting will probably go into the ground beginning to mid-May. The picture above of dates and veggies underneath will be the days I will have to start my plants inside. For them, I will probably be starting them at the end of the time frame, just so they don’t get too big, if I do have to wait until mid- or late May before planting. What else… I will be planting two rows of tomatoes, and I’ll be doing one variety per row. I will also be planting both banana peppers and bell peppers in my pepper row. I have tons on Marigold seeds, so I’ll be starting them in every flower bed around my house, and I also learned to get them in the ground super early, or they won’t sprout. I learned the same with dill last year.
That’s all I can think to clarify. If you have any questions or comments, feel free to comment below! Thanks for reading!
After revisiting this recipe from January, I felt the need to readdress it, improve it, and publish it with new photos and better flavor. Using fresh onions is much better than using dried minced onion. Onion powder is necessary to enhance the ranch flavor. Garlic powder is also better than fresh garlic because it can also disperse better. I added fresh green beans from my last fall harvest, and they were delicious and added great texture to this side dish. You could also add diced bell peppers if you want more excitement. I increased the amount of dressing that was made, and I increased the pasta amount to make 4-5 side portions for this recipe.